Taming AI Coding: A Team Playbook for Harness Engineering
The cost of shipping code has fallen to nearly zero, but the cost of shipping good code hasn't. What Harness Engineering does is write the standard for "good code" directly into the system, so AI can get the work done on its own within those constraints.
Why does every team member have to follow this playbook?
AI coding tools are reshaping how software gets built. Once everyone on the team can generate code quickly with AI, what actually separates people is no longer "who writes fastest" but "who writes well, who writes stably, who writes maintainably."
This playbook isn't a constraint — it's the team's shared language and quality floor:
- For individuals: it helps you build the right habits for working with AI, avoid costly rework, and lets AI genuinely become a force multiplier for your productivity
- For teams: it keeps everyone's output consistent in style and architecture, reviewable and maintainable, and cuts down on collaboration friction
- For projects: it locks quality standards into the toolchain, so the project doesn't spiral out of control every time people rotate in or out
What this document is for:
- Part One (Chapters I–II) answers "why" and "what": it lays out the core philosophy of Harness Engineering and the design of an integrated AI coding architecture
- Part Two (Chapters III–IX) answers "how": it provides a phased rollout roadmap, concrete configuration steps, day-to-day development SOPs, a summary of anti-patterns, and an automated compliance self-check built on our own
harness-auditSkill - Part Three (Chapter X) wraps up
A note on where to focus while reading:
There's already no shortage of introductory articles online and inside the company explaining what MCP, Skills, Rules, SDD, and knowledge bases are — this post won't spend space repeating those well-worn definitions. What it actually wants to get across is two other things:
- First, where each tool functionally sits within the Harness framework. MCP and Skills are each easy enough to understand in isolation, but once you place them inside Harness's six pillars, what role each one plays, what layer of problem it solves, and where in the AI workflow it actually kicks in — that's what determines whether a team can actually put them to good use.
- Second, how they actually work together in real development scenarios. MCP provides the data channel, Skills package domain expertise, the knowledge base injects business context, and Rules draw the behavioral boundaries — none of these tools exists in isolation, and the real power comes from combining them. This post walks through concrete scenarios (feature development, bug fixes, code review, and so on) to show exactly how they collaborate.
In practice, most of us are already using Harness-style thinking in day-to-day development to some degree — what's missing is a systematic framework that pulls these tools' usage patterns together into one coherent picture.
If you want to untangle the design logic behind these tools — which one to use in your own project, how to combine them, and when not to use them — this playbook is for you.
Part One: Philosophy and Architecture
I. Core Philosophy: Harness Engineering
1.1 What Is Harness Engineering?
In February 2026, OpenAI published an article, "Harness Engineering: Leveraging Codex in an Agent-First World." A team of 3 engineers (later expanded to 7), working under a strict no-hand-written-code rule, used AI agents to write over a million lines of code and merge 1,500 pull requests in five months — roughly a 10x productivity gain.
The word "harness" comes from horsemanship — reins, saddle, stirrups. An untamed horse has plenty of power, but you can't get it to plow a field, haul cargo, or carry you into battle. AI is the same:
Agent = Model + Harness. The model supplies the intelligence; the harness turns that intelligence into productivity.
An LLM by itself has no state, no tools, no memory. The harness layer is the engineering infrastructure that gives the model "hands, feet, and memory." Every line of code you write and every rule you configure is part of the harness.
┌─────────────────────────────────────────────────────┐
│                  Application Layer                   │
│      IDE plugin / CLI / Web UI / user interaction     │
├─────────────────────────────────────────────────────┤
│              Harness Layer (Agent Harness)            │
│  Tool calling · Context management · Permission checks │
│  Execution orchestration · Evaluation · Guardrails &   │
│  recovery · Memory system                              │
├─────────────────────────────────────────────────────┤
│                    Model Layer                        │
│         LLM (Claude / GPT / DeepSeek, etc.)            │
│     Understands instructions · Generates text ·         │
│     Makes decisions                                     │
└─────────────────────────────────────────────────────┘
1.2 Why You Need a Harness — Three Fatal Flaws of Vibe Coding
"Vibe coding" without harness constraints follows a predictable arc: extremely fast start → chaos in the middle → collapse at the end:
| Problem | Symptom | Consequence |
|---|---|---|
| Architectural chaos | The agent loves shortcuts — feature A uses library X, feature B uses library Y (even though X could've done the job too), with zero sense of layering | The moment you need to swap out underlying logic (say, change databases), the whole project needs a rewrite |
| Context avalanche | Past ~50 files, the agent starts "forgetting" — it uses user_id on day 1, then suddenly switches to uid on day 3 | The bigger the project gets, the dumber the agent gets — fixing one bug spawns two new ones |
| Loss of maintainability | The entire development process is a black box; only the agent knows how the code came to be, and no human ever thought it through | When a human tries to take over, reading thousands of lines of "throwaway code" from scratch is worse than just rewriting it |
Harness Engineering exists to solve exactly these problems:
- Security boundaries: permission control, audit logs, rejection tracing
- Observability: token counting, cost tracking, decision logs
- Reliability: retry mechanisms, fallback strategies, deterministic backstops
- Extensibility: tool ecosystem, skill system, multi-agent coordination
1.3 Harness's 6 Pillars and How They Map to Coding
Harness Engineering breaks an agent's runtime environment down into six pillars, and each one has corresponding tools and practices in our development playbook. Let's go through them one at a time.
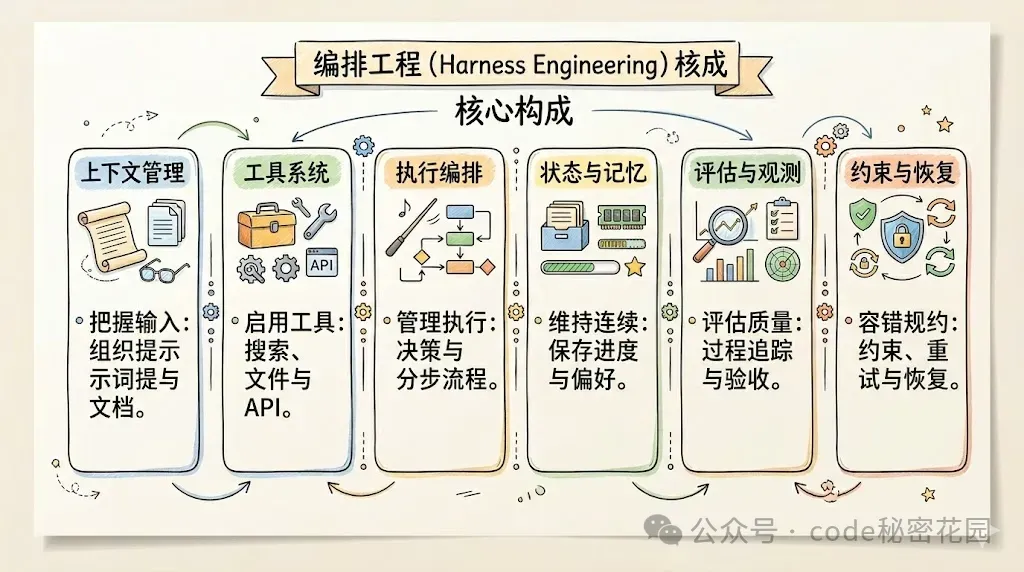
The diagram above is from this WeChat article: https://mp.weixin.qq.com/s/gs5ndvlMqM-Y4jg1_D2aFw, which explains Harness in detail — this post won't repeat that here.
Here we'll focus only on how the practical tools fit into that picture.
Pillar One: Context Architecture
The problem: an AI's context window is limited and expensive — how do you make sure it sees the right information at the right time?
| Practice | Tool | Description |
|---|---|---|
| Progressive disclosure | AGENTS.md | Write a ~100-line index file pointing to ARCHITECTURE.md, Rules, and other detailed docs — don't dump thousands of lines in at once |
| Structured specs | Spec .md files (requirement.md / task.md) | Write requirements and design decisions into the Git repo, turning them into "long-term memory" the AI can pull up anytime |
| Change isolation | changes/ directory | Use a Proposals mechanism to keep "incremental changes" separate from "existing code," reducing accidental damage to existing logic |
| Knowledge layering | Skills loaded on demand | Skill information is split into three layers (description → instructions → detailed steps), loaded progressively as needed to save context |
| Knowledge base mounting | Knowledge bases (iWiki, code repos, custom files) | Mount team wikis, code repos, and business docs as knowledge bases, referenced automatically or manually during AI conversations to supply business context |
| Turning code into knowledge | AI Wiki | Automatically generates structured knowledge docs from the codebase, so the AI can understand the whole project without reading every file |
A few principles:
- Don't hand the AI a thousands-of-lines spec file
- Build a layered index and let the AI drill down as needed
- Mount the team wiki and business docs as knowledge bases so the AI has business context
- Treat repo knowledge as the "system of record" — don't rely on chat history
OpenAI hit this pitfall themselves: early on they tried a single giant AGENTS.md, and it failed. The right approach is to split it into multiple focused documents, strung together with an index.
Pillar Two: Tool System
The problem: how does an AI reach the real world beyond the code repo, and how does it acquire domain-specific expertise?
The tool system has three parts: MCP (connecting to the outside world), Skills (packaging expert experience), and knowledge bases (injecting business context). Together, they form the complete capability system for an AI agent.
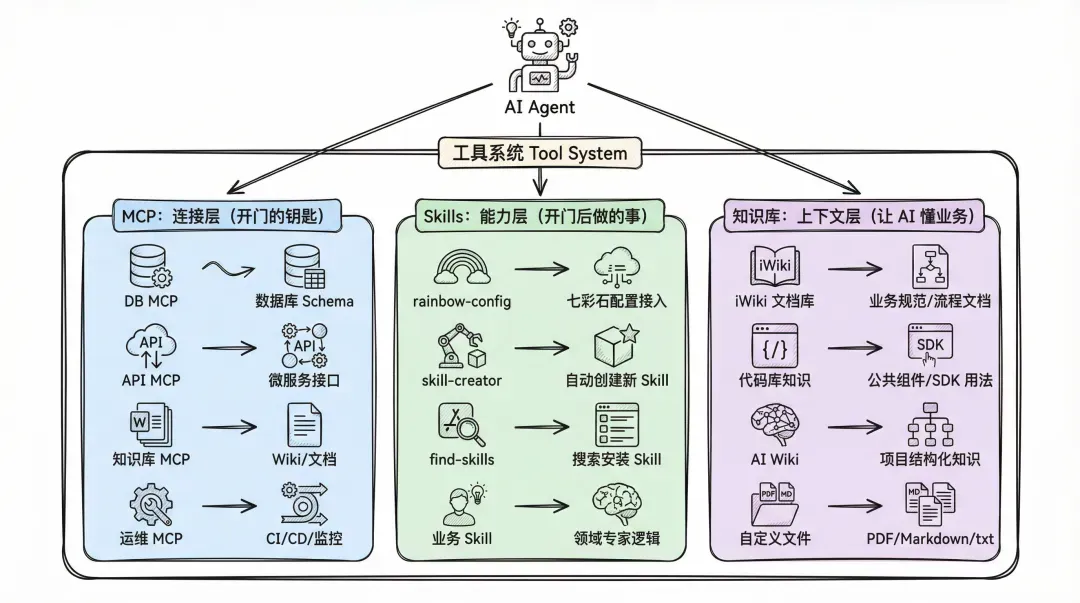
MCP (Model Context Protocol) — connecting to external data sources
| MCP Type | Function | Typical Scenario |
|---|---|---|
| DB MCP | Automatically reads live database schemas | Keeps the AI from inventing fields that don't exist, and generates accurate SQL |
| Knowledge Base MCP | Mounts internal team documentation | Gives the AI business context and domain terminology |
| API MCP | Queries other services' interface definitions in real time | Keeps interface parameters consistent during microservice integration |
| Ops MCP | Connects to CI/CD and monitoring systems | Lets the AI trigger builds, view logs, and analyze alerts directly |
Skills (Agent Skills) — packaging domain expertise
Skills package up business logic, domain knowledge, and execution SOPs, turning the AI from a jack-of-all-trades into an expert in a specific domain.
| Skill Type | Function | Typical Scenario |
|---|---|---|
| Tool-integration skills | Package the integration conventions for internal toolchains | rainbow-config: connects to the 七彩石 (Rainbow) config center following the standard process |
| Code-generation skills | Lock in code-generation logic for a specific pattern | Generates CRUD modules and middleware-integration code per the team's architecture standard |
| Meta-skills | Let the AI extend itself | skill-creator: teaches the AI to create new Skills based on existing code |
| Discovery skills | Find available capabilities from the community | find-skills: searches and installs Skills from a library of 80,000+ |
Knowledge Base — injecting business context
The knowledge base is what turns the AI from a "general-purpose model" into "an assistant that knows your business." Once team documents, code repos, and business materials are mounted, the AI can automatically pull in business context during conversations — less guessing, more doing.
| Knowledge Base Type | Data Source | Typical Scenario |
|---|---|---|
| iWiki document library | Team wiki space | Mount business specs, technical proposals, and API docs, referenced automatically when the AI answers |
| Code repo knowledge | 工蜂 (Gongfeng, Tencent's internal Git platform) Git repos | Mount shared components (e.g. tRPC, the 七彩石 SDK), so the AI references correct usage when generating code |
| AI Wiki | Auto-generated from the codebase | Automatically generates structured knowledge docs from the codebase, for quickly understanding project architecture and module logic |
| Custom files | Markdown, PDF, txt | Upload requirement docs, design mockups, meeting notes, etc., to give the AI project background |
Ways to use the knowledge base:
- Explicit reference: type
@KnowledgeBasein a conversation to select a specific knowledge base - Automatic reference: turn on the auto-reference switch, and the AI will automatically retrieve relevant knowledge during conversations
- Team sharing: share a knowledge base with your team/org through the Knot platform (for team-wide knowledge sharing), keeping everyone's business understanding aligned
The core analogy: MCP is the key that opens the door, Skills are what you do once you're inside, and the knowledge base is the manual you read before walking in. None of the three is optional — without MCP, the AI is working blind; without Skills, it has the key but doesn't know what to do once inside; without a knowledge base, it gets in the door but still doesn't understand the business.
Pillar Three: Execution Orchestration and Multi-Agent Collaboration
The problem: how do you keep the AI working step by step instead of writing chaotically? How do multiple agent roles collaborate to complete complex tasks?
Execution orchestration isn't just about picking a mode (Plan vs. Agent) — it's a standardized workflow for multi-agent collaboration. Teams should follow a "3+1 Phase" process, with a different agent role responsible for each phase:
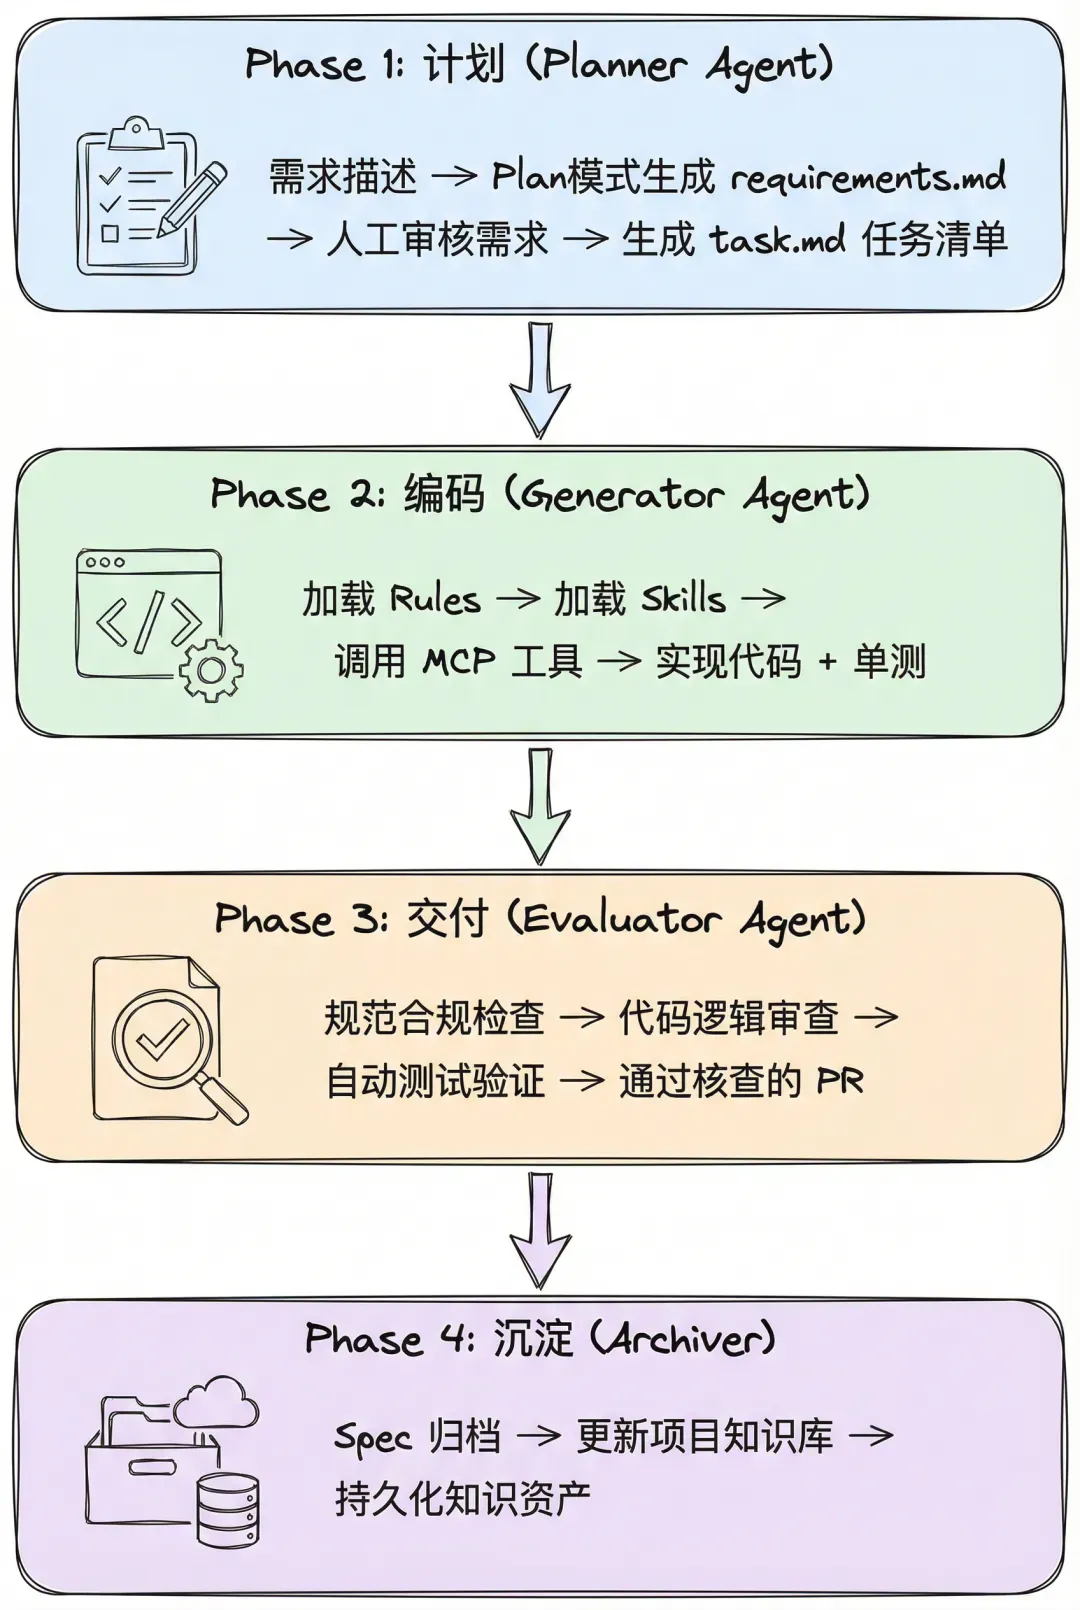
The "3+1 Phase" standardized workflow:
| Phase | Input | AI Action | Output | Collaboration Mode |
|---|---|---|---|---|
| Phase 1: Plan | Requirement description | Plan mode generates requirements.md; task.md is created after human review | A structured proposal document | Human reviews the proposal |
| Phase 2: Code | Task list | Loads Rules and Skills, calls MCP tools to implement code | Source code + unit tests | Generator agent executes |
| Phase 3: Deliver | Code pending merge | AI automatically runs compliance checks and reviews code logic | A PR that has passed inspection | Evaluator agent signs off |
| Phase 4: Archive | Merged requirement | Automatically archives the spec, updates the project knowledge base | Persisted knowledge asset | Automated archiving |
Multi-agent role definitions:
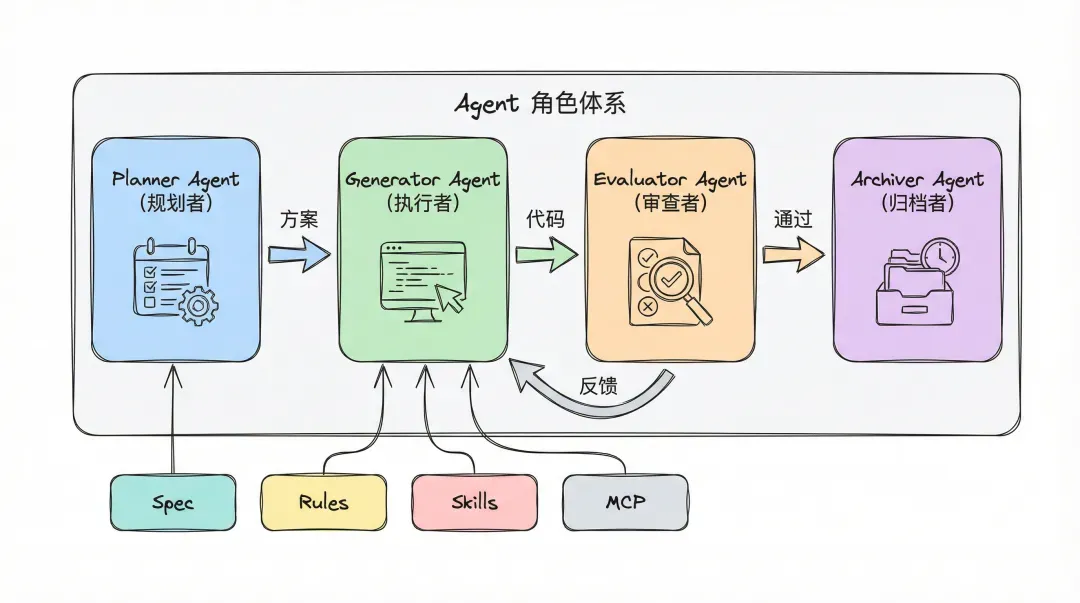
| Agent Role | Responsibility | Harness Loaded |
|---|---|---|
| Planner | Understands requirements, breaks down tasks, produces the proposal | Plan mode + project spec |
| Generator | Writes code and tests according to the plan | Rules + Skills + MCP |
| Evaluator | Code review, compliance checks, test verification | Rules + acceptance criteria |
| Archiver | Archives changes, updates the knowledge base | Archiving scripts + Git |
In practice:
- Use Plan mode for architectural analysis and breaking down large tasks (the Planner role)
- Use Agent mode for automated implementation of specific features (the Generator role)
- Use AI code review as the quality gate before delivery (the Evaluator role)
- Follow the SDD workflow:
requirements.md → human review → task.md → execution → archiving - Every task must have clear acceptance criteria
Pillar Four: State & Memory
The problem: how do you keep the AI consistent over a long development cycle?
| Memory Type | Implementation | Lifecycle |
|---|---|---|
| Short-term memory | Current session context | A single conversation |
| Mid-term memory | Memories feature | Persists across sessions |
| Long-term memory | Spec files in the Git repo | The project's entire lifecycle |
| Change memory | Spec deltas (changes/ directory) | A single change cycle |
In practice:
- Use Git to record spec changes (spec deltas), forming the project's long-term memory
- Use the Memories feature so the AI remembers coding habits and project details
- After each change is archived, automatically update the archive record under
.codebuddy/plan/
Pillar Five: Evaluation & Observability
The problem: how do you verify that the code an AI generates is actually trustworthy?

Evaluation happens on four levels:
| Level | What It Checks | Tool / Method |
|---|---|---|
| L1 Syntax | Compiles, passes lint | go build / golangci-lint |
| L2 Logic | Passes unit tests | go test / auto-generated test cases |
| L3 Compliance | Conforms to Rules | Automated AI compliance check |
| L4 Architecture | Doesn't break the existing design | Joint human + AI review |
In practice:
- Bring in AI code review to automatically check compliance before merging
- After code is written, automatically compile and run basic self-tests (a closed-loop verification)
- For changes with wider impact, automatically generate a changelog
Pillar Six: Guardrails & Recovery
The problem: how do you keep the AI from overstepping its bounds, and how do you recover quickly when something goes wrong?
Constraints come in three tiers:
┌──────────────────────────────────────────┐
│  Hard red lines (Rules — non-negotiable)  │
│  "Every API must include Swagger annotations" │
│  "No business logic in the Controller layer"  │
│  "All DB queries must go through the Repository pattern" │
├──────────────────────────────────────────┤
│  Soft constraints (Skills — recommended)   │
│  "Prefer existing utility classes in the project" │
│  "Log format follows the team-wide standard"      │
├──────────────────────────────────────────┤
│  Safety policy (Safety — fallback protection) │
│  "For DB changes, generate a SQL script first" │
│  "Auto-detect impact scope before high-risk ops" │
│  "Auto-backup before important operations"        │
└──────────────────────────────────────────┘
Recovery mechanisms:
- All changes are managed through Git and can be rolled back at any time
- The spec deltas mechanism keeps every change traceable
- Automatically revert to the last stable state on a compile failure
1.4 Master Table: The 6 Harness Pillars Mapped to the Toolchain
| Pillar | Core Question | Corresponding Tools | Team Practice |
|---|---|---|---|
| Context Architecture | What information does the AI see? | Spec docs, AGENTS.md, knowledge base | Structured specs + progressive disclosure + business knowledge mounting |
| Tool System | What can the AI reach? | MCP, Skills, knowledge base | Live DB/API integration + accumulated business knowledge + Skills-based expertise |
| Execution Orchestration & Multi-Agent Collaboration | In what order does the AI act, and who acts? | Plan mode, SDD workflow, multi-agent role system | "3+1 Phase": Planner → Generator → Evaluator → Archiver |
| State & Memory | What does the AI remember? | Git + Memories + spec deltas | Persistent long-term memory |
| Evaluation & Observability | Is the AI doing it right? | Automated tests + AI code review | Compile → test → review closed loop |
| Guardrails & Recovery | What can't the AI do? | Rules + safety policies | Hard red lines + automatic rollback |
The rest of this document walks through the concrete tool configurations in detail.
II. The Integrated AI Coding Architecture
Building on Harness Engineering's six pillars, this chapter turns them into a complete architecture. It defines the full path from "a person's idea" to "code that actually runs" — call it the technical blueprint for the team's AI-assisted development.
Put plainly: AI isn't an isolated code generator — it's a node embedded inside the entire engineering system. Every layer of the architecture maps to one of Harness's pillars, keeping the AI working within its constraints.
2.1 The Full Architecture Diagram
Over the course of our development practice, we put together an overall architecture diagram for AI coding. From top to bottom it has five layers: Input Layer → Workbench (CodeBuddy) → Underlying Support (MCP) → Output Layer → Metrics Layer, with data flowing top-down to form a closed loop:
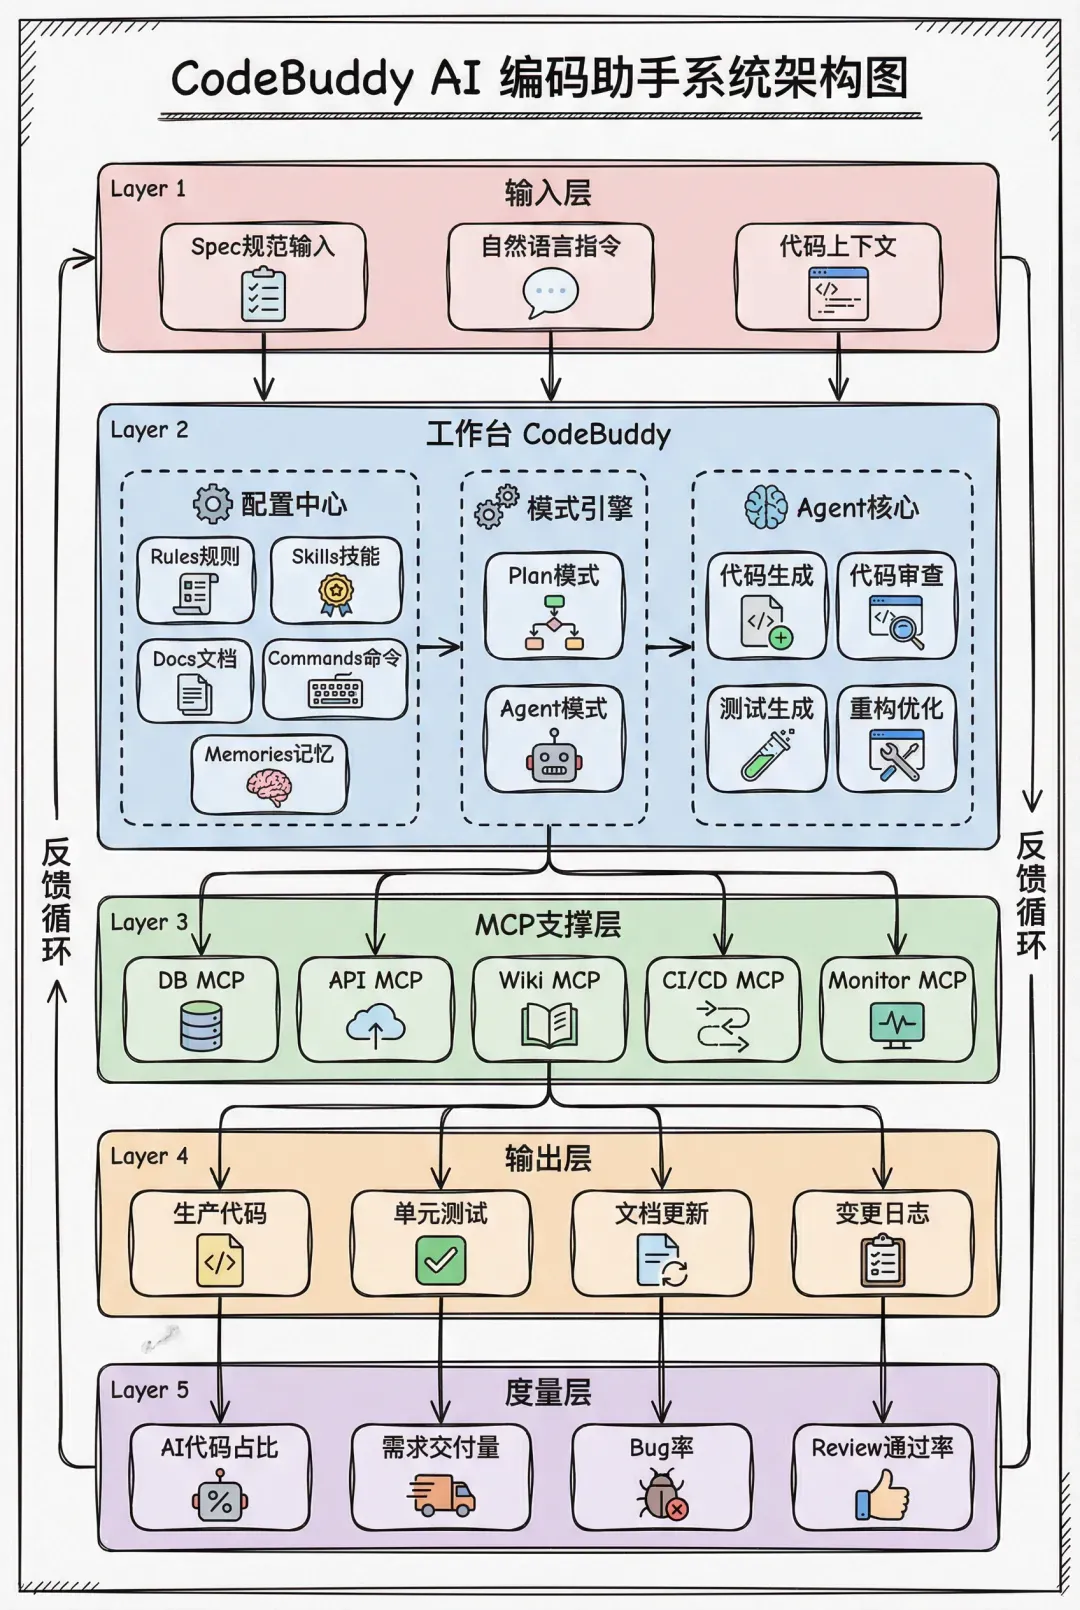
Layer responsibilities
The table below explains the components and responsibilities of each layer in the architecture:
| Layer | Components | Responsibility |
|---|---|---|
| Input Layer | Spec docs (requirement.md) / natural language / code context | Turns a person's idea into structured input the AI can understand |
| Configuration Center | Rules, Skills, Docs, Commands, Memories | Loads Harness constraints, keeping AI behavior controllable |
| Mode Engine | Plan mode / Agent mode | Picks an execution strategy based on task complexity |
| Agent Core | Code generation, review, testing / refactoring | Executes the concrete development tasks |
| MCP Layer | DB, API, Wiki, CI/CD, Monitor | Connects to external systems, reaching beyond the code repo's boundary |
| Output Layer | Code, tests, docs / logs | Delivers runnable engineering artifacts |
| Metrics Layer | AI code share, delivery volume, bug rate | Quantifies the impact of AI-assisted development |
How data flows
Human idea → [Input Layer] → Structured input
                         ↓
        [Config Center] loads constraints → [Mode Engine] picks strategy
                         ↓
                    [Agent Core] executes the task
                      ↓         ↓
        [MCP Layer] fetches external data   [Output Layer] delivers artifacts
                                        ↓
                            [Metrics Layer] quantifies impact → feeds back into refining the playbook
Note this isn't a one-way pipeline — it's a closed loop. Data from the metrics layer feeds back into the config center, driving the iteration of Rules and Skills. For instance, if metrics show the bug rate climbing, the team should check whether it needs new Rules constraints or should optimize existing Skills.
Part Two: Putting It Into Practice
The two chapters above laid out Harness Engineering's core philosophy and the design blueprint for an integrated AI coding architecture. Once you understand the "why" and the "what," the most important question becomes "how." This part focuses on how to roll the playbook out into day-to-day team development, step by step. Every section includes concrete operating steps, configuration examples, and acceptance criteria, so team members can follow along and get it working.
III. Implementation Roadmap (Three Progressive Phases)
Rolling this out isn't a one-shot effort. We've split the process into three phases, each with clear goals and acceptance criteria:
| Phase | Goal | Timeline | Core Deliverables |
|---|---|---|---|
| Phase One: Foundation Building | Get everyone on the team using AI coding tools, and establish a basic constraint system | 1-2 weeks | CodeBuddy installed + team-harness repo + baseline Rules + knowledge base configured |
| Phase Two: Tool Integration | Integrate MCP, accumulate Skills, put Plan-mode SDD into practice | 2-4 weeks | MCP integrated + Skills accumulated + spec-driven development workflow up and running |
| Phase Three: Continuous Optimization | Build a self-evolving knowledge system, achieve the knowledge flywheel effect | Ongoing | Metrics dashboard + playbook iteration mechanism + knowledge flywheel |
IV. Phase One: Foundation Building (Quick Start)
Goal: get everyone on the team using AI coding tools, and establish a basic constraint system.
4.1 Installing and Configuring CodeBuddy
4.1.1 Installing the IDE Plugin
Installing on VSCode:
- Go to the CodeBuddy website and download the
.vsixplugin file - In VSCode, go to Extensions →
...→ Install from VSIX → select the downloaded plugin - Press
Command(⌘) + LorCtrl + L; the CodeBuddy icon appearing at the bottom confirms a successful install - Log in, and confirm that both Plan mode and Agent mode work correctly
Installing on JetBrains IDEs (GoLand, PyCharm, IDEA, etc.):
- Go to the CodeBuddy website and download the JetBrains plugin
.zipfile (note: do not unzip it after downloading) - In the IDE, go to Plugins →
⚙️→ Install Plugin from Disk → select the downloaded.zipfile - The CodeBuddy icon appearing at the bottom confirms a successful install
- Log in, and confirm chat works correctly
⚠️ Safari on Mac auto-extracts zip files by default. We recommend unchecking "Open safe files after downloading" in Safari's settings.
4.1.2 Installing CLI Tools (Optional)
Three top-tier CLI coding tools are already integrated internally — pick whichever fits your workflow:
| CLI Tool | Install Command | Launch Command | Config Directory |
|---|---|---|---|
| Claude Code Internal | `npm install -g --registry=https://xxx.com/ | claude-internal | ~/.claude-internal/ |
| Gemini CLI Internal | npm install -g --registry=https://xxx.com/ | gemini-internal | ~/.gemini/ |
| Codex CLI Internal | npm install -g --registry=https://xxx.com/ | codex-internal | ~/.codex-internal/ |
Prerequisite: Node.js 20 or later. All three are among the strongest AI coding tools in the industry — pick whichever matches your personal habits.
4.1.3 Core CodeBuddy Configuration
After installation, complete the following core configuration steps to get the most out of CodeBuddy:
1. Model selection
Switch models from the bottom-left of the chat panel. Recommended strategy:
| Scenario | Recommended Model | Notes |
|---|---|---|
| Complex coding tasks | Claude-4.6-Sonnet/Opus (stronger) / GPT-5.4 | External models with top-tier coding ability, but code context leaves the network |
| Simple questions / sensitive business logic | DeepSeek-V3.2, GLM-4.7, HY-2.0 | Deployed internally, code never leaves the domain, security guaranteed |
| Not sure which to pick | Auto (smart auto-selection) | Automatically matches the best model based on question complexity |
⚠️ Security reminder: external models like Claude, GPT, and Gemini send code context outside the company network — use internally deployed models for sensitive business logic.
2. Memories configuration (the memory feature)
Memories lets CodeBuddy remember your coding habits and project details, persisting across sessions.
How to enable it:
- In the CodeBuddy settings page, select the Memories option
- Confirm the Memories toggle is switched on
Active memory: in an Agent-mode conversation, just tell CodeBuddy directly what you want it to remember:
Please remember:
1. I develop in Go and the project uses the gin framework
2. Code comments should be in Chinese
3. Variable names should use camelCase
4. All API responses use the standard format from the pkg/response package
Managing memories: go to CodeBuddy's settings page → Memories to view, edit, or delete saved memories.
3. Commands configuration (command-style interaction)
Commands package high-frequency development tasks into reusable commands — essentially "standardized prompts you can trigger quickly."
Creating a Command:
- Type
/in the chat box and select "Add Command" - Enter a name for the command (English names are recommended)
- Fill in the command's content (i.e., the preset prompt)
Recommended team Commands:
| Command Name | Purpose | When to Trigger |
|---|---|---|
/init | Bootstrap the AI usage manual for a project (auto-generates Rules) | The first time a new project is used |
/pre-mr-checklist | Security & vulnerability check before committing code | Before submitting a PR |
/spec-create | Create a requirement spec document | When starting a new requirement |
/spec-plan | Generate a task list from a spec | After a requirement passes review |
Example content for the /init Command:
Please analyze this codebase and create a global.md file under the
`.codebuddy/rules` directory of the current codebase. This file will
be provided to future CodeBuddy instances operating on this codebase.

Content to include:
1. Frequently used commands — how to build, how to lint, how to run tests
2. A high-level view of the code architecture and structure, focused on
   the "big picture" design

Instructions:
- If the file already exists, improve it
- Don't include generic development practices
- Make sure the file starts with this header metadata:
---
# CodeBuddy Rules
type: always
---
⚠️ Acceptance criteria: every team member can bring up the CodeBuddy chat panel in their IDE, token usage is normal, and they can demonstrate a prompt that implements a simple project.
4.2 Creating the team-harness Repository
This is the single source of truth for the team's playbook — all Rules, Skills templates, and AGENTS.md templates are centrally managed here.
Step 1: Initialize the repo structure
# Create the repo
mkdir team-harness && cd team-harness
git init

# Create the standard directory structure
mkdir -p rules/{global,golang,python,frontend}
mkdir -p skills/{common,business}
mkdir -p templates
mkdir -p docs

# Create the core files
touch rules/global/base.md
touch rules/golang/go-backend.md
touch templates/AGENTS.md
touch templates/project.md
touch README.md
Final directory structure:
team-harness/
├── rules/                      # The team's Rules collection
│   ├── global/                 # Global, universal rules
│   │   └── base.md             # Baseline standard (must be loaded by every project)
│   ├── golang/                 # Go-specific rules
│   │   └── go-backend.md
│   ├── python/                 # Python-specific rules
│   └── frontend/               # Frontend-specific rules
├── skills/                     # The team's Skills collection
│   ├── common/                 # General-purpose Skills
│   │   ├── skill-creator/      # Skill creator
│   │   └── find-skills/        # Skill search tool
│   └── business/                # Business Skills
│       └── rainbow-config/     # 七彩石 (Rainbow) config integration
├── templates/                  # Template files
│   ├── AGENTS.md               # AI usage manual template
│   └── project.md              # Project description template
├── docs/                       # Usage docs
│   └── onboarding.md           # New-hire onboarding guide
└── README.md
Step 2: Write a sync script
Use a script in each business project to automatically pull the latest playbook:
#!/bin/bash
# sync-harness.sh - sync the team playbook into the current project
HARNESS_REPO="git@xxx.com"
HARNESS_DIR=".harness-upstream"

# Pull the latest playbook
if [ -d "$HARNESS_DIR" ]; then
    cd $HARNESS_DIR && git pull && cd ..
else
    git clone $HARNESS_REPO $HARNESS_DIR
fi

# Sync Rules into the project
mkdir -p .codebuddy/rules
cp $HARNESS_DIR/rules/global/*.md .codebuddy/rules/
cp $HARNESS_DIR/rules/golang/*.md .codebuddy/rules/  # pick based on language

# Sync Skills into the project
mkdir -p .codebuddy/skills
cp -r $HARNESS_DIR/skills/common/* .codebuddy/skills/

echo "✅ Team playbook sync complete"
Step 3: Configure automatic CI sync (optional)
Add an automatic sync step to the project's CI pipeline, so the playbook is always current before every build.
4.3 Rules Configuration (Global and Project-Level Constraints)
Rules are the global constraints an AI must load on every interaction — think of them as the "law" the AI has to obey. CodeBuddy supports three tiers of Rules:
4.3.1 The Rules Tier System
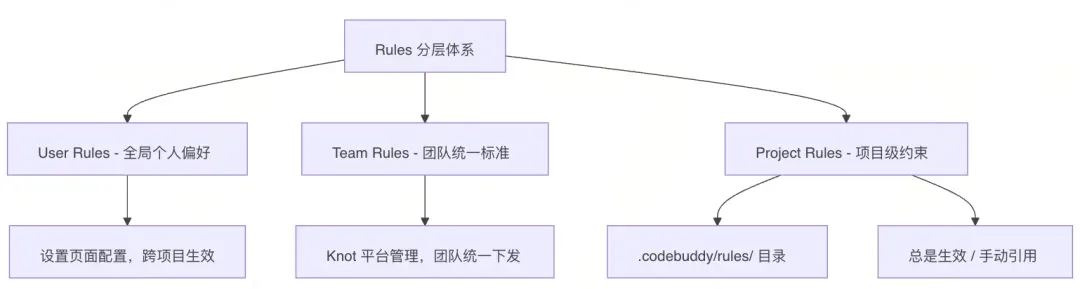
| Tier | Scope | Configured Via | How It Loads |
|---|---|---|---|
| User Rules | All projects (personal) | CodeBuddy settings page → Rules | Automatically included in every conversation |
| Team Rules | All team members | Managed and distributed via the Knot platform | Configured by type (always / manual) |
| Project Rules | A single project | .md files under .codebuddy/rules/ | Always active, or referenced manually with @ |
4.3.2 Configuring User Rules
- Click the settings gear icon in the CodeBuddy chat panel
- Go to the Rules settings page
- Add your personal preference rules, or use the platform's preset Rules to quickly generate a starting point and fine-tune it
# Example personal preferences
1. Reply in Chinese
2. Write code comments in Chinese
3. Prefer the Go standard library
4. Use camelCase for variable names
4.3.3 Configuring Team Rules (via the Knot Platform)
Team Rules are centrally managed and distributed by the team admin on the Knot platform, ensuring every team member follows the same standard.
Configuration steps:
- Go to the Knot Rules management page
- Click "New Team Rule"
- Fill in the rule content; the header must include a rule type header:
---
type: always
---
# Team Go Backend Development Standard

## Architectural Constraints
1. Strictly follow the layered architecture: Controller → Service → Repository → Model
2. No business logic in the Controller layer
...- Submit for approval — once approved, the Team Rule takes effect automatically
- Team members' CodeBuddy instances will automatically load Team Rules that are in effect
💡 A Team Rule's
typesupports two modes:always(always active) andmanual(manually referenced).
4.3.4 Configuring Project Rules
How to create one:
- In the CodeBuddy chat panel, click "Add Project Rule"
- Enter the rule content (careful not to modify the header metadata)
- Set the scope of when it applies:
- Always active: automatically included in every conversation
- Manually specified: needs to be selected with
@Rulesduring a conversation
Rules file structure convention:
---
description: "General standard for Go backend development"
globs: "**/*.go"
alwaysApply: true
---

# Go Backend Development Standard

## I. Architectural Constraints (Hard Red Lines)
1. Strictly follow the layered architecture: Controller → Service → Repository → Model
2. No business logic in the Controller layer — Controller only handles parameter validation and response packaging
3. All database operations must go through the Repository layer; no writing raw SQL directly in Service
4. Every public-facing API must include Swagger annotations

## II. Code Style
1. Functions/methods must have a brief comment explaining their purpose
2. Error handling must not discard errors with `_`; errors must be handled explicitly or propagated upward
3. Use camelCase for variable names, ALL_CAPS for constants
4. A single function should not exceed 80 lines; split it up if it does

## III. Security Policy
1. For database changes, generate a SQL migration script first rather than executing directly
2. Deleting or moving files needs no extra confirmation, but database schema changes must be confirmed
3. All sensitive configuration (secrets, connection strings) must be read from the config center — no hardcoding

## IV. Development Behavior
1. Before adding a new feature, analyze the existing codebase first and prefer reusing existing modules
2. Keep the scope of code changes minimal — one PR solves one problem
3. Every change must come with a clear commit message
4. New features must come with unit tests written at the same time
4.3.5 The Save-and-Reuse Flow for Rules
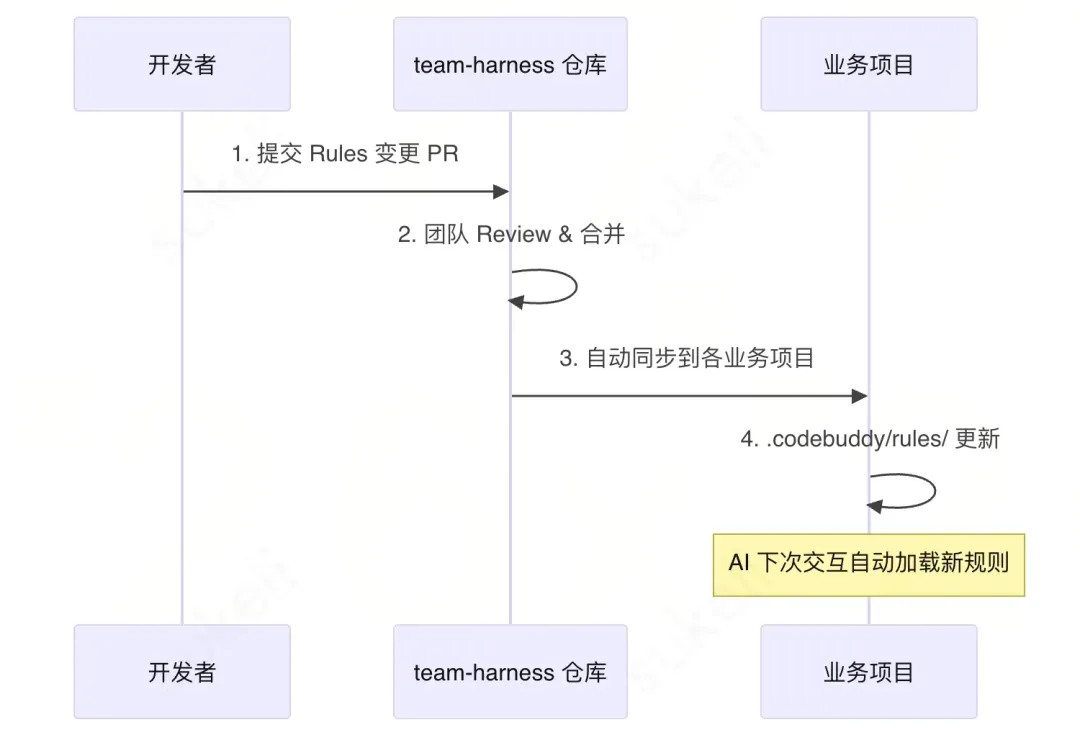
This flow runs as a sequence between the business project, the team-harness repo, the developer, and AI — with the next interaction automatically loading the new rule:
- Submit a Rules-change PR
- The team reviews and merges it
- It's automatically synced out to each business project
.codebuddy/rules/gets updated
Verifying Rules are in effect:
# Test this in CodeBuddy
Hi, can you tell me which Rules are currently loaded?
The AI should be able to recognize and list the loaded rule files.
4.4 Writing AGENTS.md
AGENTS.md is the AI's "manual." Keep it under ~100 lines and use it as a directory index pointing to more detailed documents.
Create an AGENTS.md file (in the project root):
# AI Development Assistant Manual

## Project Overview
This project is [project name], built on a Go microservices architecture using the [framework name] framework.

## Architecture
- Layered architecture: Controller → Service → Repository → Model
- Detailed architecture docs: see `docs/ARCHITECTURE.md`

## Directory Structure
- `internal/` - business logic (split into subdirectories by service)
- `pkg/` - shared utility libraries
- `api/` - API definitions (Proto/Swagger)
- `configs/` - configuration files
- `scripts/` - scripting tools

## Development Standards
- Code style: see `.codebuddy/rules/go-backend.md`
- Database conventions: all queries go through the Repository layer
- Error handling: wrap errors uniformly using the `pkg/errors` package

## Common Commands
- Build: `go build ./...`
- Test: `go test ./...`
- Lint: `golangci-lint run`

## Currently Active Requirements
- See active requirements under the `.codebuddy/plan/` directory

## Notes
- Before adding a new feature, check `pkg/` for a reusable utility first
- Database changes must have a SQL script generated first
- Any API change needs the Swagger docs updated
⚠️ AGENTS.md is a directory index, not an encyclopedia. Keep it lean, and let the AI drill into specific docs as needed.
4.5 Knowledge Base Configuration (Detailed Walkthrough)
The knowledge base is the core mechanism for giving the AI business context. Once team documents, code repos, and business knowledge are mounted, the AI goes from "general intelligence" to "an expert who knows your business."
4.5.1 Knowledge Base Types and Use Cases
| Knowledge Base Type | Data Source | Use Case | Configured In |
|---|---|---|---|
| iWiki document library | Team wiki space | Business docs, technical proposals, API docs, ops manuals | Knot platform |
| 工蜂 (Gongfeng) code repo | Git repo code | Shared component SDKs, framework source, reference implementations | Knot platform |
| Custom files | Markdown, txt, PDF | Requirement docs, design mockups, meeting notes, domain knowledge | Knot platform |
| AI Wiki | Auto-generated from the codebase | Understanding project architecture, mapping out module logic, new-hire onboarding | Built into CodeBuddy |
4.5.2 Creating a Team-Shared Knowledge Base on the Knot Platform
Step 1: Create the knowledge base
- Go to the Knot knowledge base management page
- Click "Add Knowledge Base"
- Choose the knowledge base type (iWiki, 工蜂 code repo, custom files)
- Fill in the knowledge base info:
- iWiki type: enter the iWiki space address
- 工蜂 code repo type: enter the Git repo address and branch
- Custom file type: upload Markdown, txt, or PDF files
Step 2: Configure the sharing scope
- On the knowledge base's detail page, turn on the "Share" toggle
- Select the org/team you want to share it with
- Submit and wait for admin approval — once approved, team sharing is complete
Step 3: Configure data sources
On the knowledge base's "Data Source Configuration" page, you can configure multiple data sources:
- Requirements: supports TAPD projects
- Code: supports 工蜂 Git repos (enter the repo address and branch)
- Docs: supports iWiki spaces
- Observability: supports 智研 (Zhiyan, the internal observability platform) projects
4.5.3 Enabling the Knowledge Base in CodeBuddy
Step 1: Go to the knowledge base settings
In the CodeBuddy chat panel, click the settings icon → go to the "Knowledge Base" option.
Step 2: Enable knowledge bases
- In the knowledge base list, turn on whichever public and personal knowledge bases you need
- Configure the auto-reference toggle (recommended: turn it on, so the AI automatically references relevant knowledge)
Step 3: Two ways to use the knowledge base
# Method 1: Explicit reference (precise control)
# Type @KnowledgeBase in the chat input to select a specific knowledge base
@TeamTechnicalDocs Please help me assess whether the current project's caching strategy makes sense

# Method 2: Automatic reference (hands-off)
# With the auto-reference toggle on, the AI retrieves relevant knowledge automatically based on the question
Please help me implement the user authentication module, following the team's existing auth approach
4.5.4 Enabling AI Wiki (Recommended)
AI Wiki is a structured knowledge base automatically generated from the codebase, helping team members quickly understand the project's architecture:
- Open AI Wiki from the menu in the top-right corner of CodeBuddy
- Follow the prompts to enable AI Wiki for the current codebase (indexing usually completes within 24 hours)
- Once enabled, you can browse project docs directly in the IDE, and clicking a file jumps to its source
- Ask AI Wiki questions with
@AIWikito quickly understand a module's logic
4.5.5 Recommended Team Knowledge Base Checklist
| Priority | Knowledge Base | Type | Content |
|---|---|---|---|
| P0 | Team technical docs | iWiki | Architecture design, technical proposals, interface docs |
| P0 | Core shared libraries | 工蜂 code repo | tRPC SDK, 七彩石 (Rainbow) SDK, 北极星 (Polaris) SDK, etc. |
| P1 | Business requirement docs | Custom files | Product requirement docs, design mockups |
| P1 | Project AI Wiki | AI Wiki | Structured docs auto-generated from the codebase |
| P2 | Ops manual | iWiki | Deployment process, monitoring & alerting, incident handling |
⚠️ Acceptance criteria: when a team member asks a business-related question in CodeBuddy, the AI should automatically reference knowledge base content to give an accurate answer, rather than a generic one.
V. Phase Two: Tool Integration (Deep Integration)
Goal: integrate MCP, accumulate Skills, initialize the spec directory structure, and practice Plan-mode SDD on a pilot project.
5.1 MCP Configuration (Breaking Through the Context Boundary)
MCP (Model Context Protocol) is the AI's "sensory reach" — it lets the AI touch the real world beyond the code repo.
5.1.1 Deciding Whether to Integrate an MCP
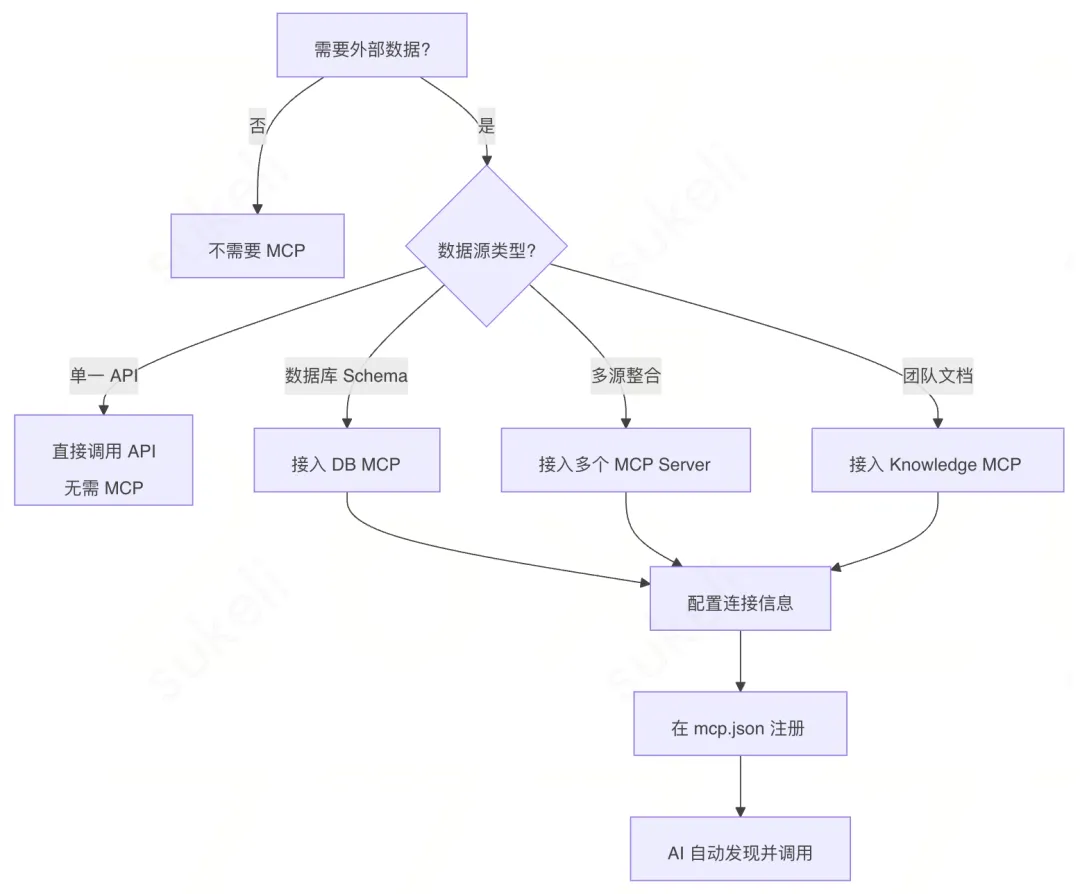
⚠️ When you shouldn't use MCP:
- Writing a simple script to check the weather → just call the API directly
- Pure logical reasoning, creative writing, code generation → MCP has almost nothing to offer here
- When the complexity of adding MCP outweighs the problem it solves → don't use it
5.1.2 Configuring MCP on the CodeBuddy Plugin Side
Step 1: Open MCP configuration
- Click "Chat Settings" in the CodeBuddy chat panel
- Click "Add MCP"
- Edit the
mcp.jsonconfig file
Step 2: Configure mcp.json
MCP supports three transport types:
stdio type (local command-line tools):
{
  "mcpServers": {
    "db-mysql": {
      "command": "npx",
      "args": ["-y", "@anthropic/mcp-server-mysql"],
      "env": {
        "MYSQL_HOST": "127.0.0.1",
        "MYSQL_PORT": "3306",
        "MYSQL_USER": "readonly_user",
        "MYSQL_PASSWORD": "${DB_PASSWORD}",
        "MYSQL_DATABASE": "your_database"
      },
      "timeout": 10000,
      "transportType": "stdio"
    }
  }
}
streamable-http type (recommended, for remote services):
{
  "mcpServers": {
    "gump-tool": {
      "url": "http://127.0.0.1:3000/mcp",
      "timeout": 10000,
      "headers": {
        "Authorization": "Bearer your-token"
      },
      "transportType": "streamable-http"
    }
  }
}
sse type (being phased out — prefer streamable-http):
{
  "mcpServers": {
    "legacy-server": {
      "url": "http://0.0.0.0:3001/sse",
      "headers": {},
      "timeout": 10000,
      "transportType": "sse"
    }
  }
}
⚠️ Notes:
timeoutis in ms, defaults to 10s, maxes out at 300s- For the stdio type,
argsmust be split into separate array items — it can't be merged into one string- MCP only takes effect in Agent mode — make sure Agent mode is on when asking
Step 3: Reference config for commonly used internal MCPs
{
  "mcpServers": {
    "gongfeng": {
      "command": "npx",
      "args": ["-y", "@tencent/tgit-mcp-server@latest"],
      "env": {
        "GONGFENG_ACCESS_TOKEN": "your 工蜂 (Gongfeng) access token"
      }
    },
    "iWiki": {
      "headers": {
        "Authorization": "Bearer your iWiki access token"
      },
      "type": "http",
      "url": "https://prod.xxx.com"
    },
    "tapd": {
      "headers": {
        "X-Tapd-Access-Token": "your TAPD personal token",
        "X-Keep-Links": "true"
      },
      "type": "http",
      "url": "http://mcp.xxx.com"
    }
  }
}
More MCPs are available from the Knot MCP Marketplace.
5.1.3 Configuring MCP on the CLI Side
Claude Code Internal:
- User-level config:
~/.claude-internal/.claude.json - Project-level config:
.mcp.jsonin the project root
Gemini CLI Internal:
- Config file:
~/.gemini/settings.json - Note: when configuring a Streamable HTTP-style MCP via the CLI,
urlneeds to be written ashttpUrl
5.1.4 Verifying the MCP Connection
Test it in CodeBuddy:
Please use the DB MCP to read the structure of the users table in the current database, and list all field names and types.If it fails, check:
- Whether the MCP server started correctly (check the logs in CodeBuddy's output panel)
- Whether the database connection info is correct
- Whether the network is reachable
- Whether Agent mode is turned on
5.1.5 Team MCP Integration Checklist
| Priority | MCP Server | Integration Purpose | Acceptance Criteria |
|---|---|---|---|
| P0 | DB MCP | AI reads live database schemas | AI can accurately describe the structure of any table |
| P0 | 工蜂 (Gongfeng) MCP | Reads the code repo, issues, and MRs | AI can read an issue and propose an implementation approach |
| P1 | iWiki MCP | Mounts the team wiki | AI can answer domain-specific business questions |
| P1 | TAPD MCP | Reads requirements and tasks | AI can read a requirement and generate a spec |
| P2 | CI/CD MCP | Triggers builds and views logs | AI can run a build and analyze the cause of a failure |
5.2 Knot Platform Configuration (Agent and Knowledge Management Hub)
The Knot platform is the management hub for the CodeBuddy ecosystem, providing unified management for knowledge bases, MCP, Rules, Skills, agents, and other core capabilities.
5.2.1 Overview of Knot's Core Features
| Feature Module | Entry Point | Function |
|---|---|---|
| Agents | knot.xxx.com | Create, manage, and share custom agents |
| Dev-efficiency knowledge base | knot.xxx.com | Create and manage team knowledge bases |
| MCP Marketplace | knot.xxx.com | Discover and install MCP servers |
| Rules Marketplace | knot.xxx.com | Get and manage Rules |
| Skills | knot.xxx.com | Manage Agent Skills |
5.2.2 Creating an Autonomous-Planning Agent on Knot
An autonomous-planning agent can analyze a task on its own and draw up an execution plan — well suited to complex, variable scenarios.
Step 1: Create a new agent
- Go to the Knot agent page
- Click "+ New Agent"
- Choose the "Autonomous Planning" type
Step 2: Configure the agent
On the agent configuration page, fill in the following:
| Field | Description | Example |
|---|---|---|
| Agent name | A short, clear name | "Team Requirement Review Agent" |
| Agent description | An accurate description of its responsibilities and capabilities (affects subagent matching) | "Reviews requirement completeness and feasibility based on TAPD requirements and the codebase" |
| Prompt | Detailed role setup and behavioral guidance | Covers identity, goals, scope of responsibility, operating instructions |
| Knowledge base | Select the associated knowledge base | Team technical docs, project knowledge base |
| MCP services | Select the MCP tools needed | TAPD MCP, 工蜂 MCP |
| Rules | Select the applicable Rules | Team coding standard |
| Skills | Select the needed Skills | skill-creator, etc. |
| Client tools | Select client-side tools | Read files, execute commands, etc. |
Step 3: Publish the agent
Once configuration is done, click "Publish Update" in the top-right corner.
5.2.3 Configuring the Agent's Usage Channels
Knot agents support multiple usage channels:
| Channel | Use Case | Configuration |
|---|---|---|
| Web chat | Everyday use, debugging | Available by default, no extra setup |
| WeCom smart bot | Team group chats, DMs | Configure the Bot ID and Secret |
| API calls | Integrating into existing systems | Obtain the API endpoint and key |
| Web URL | Sharing with external users | Generate a standalone web link |
| Knot CLI | Command-line use | Install the Knot CLI tool |
| Pipeline | CI/CD integration | Configure it inside a 蓝盾 (BlueShield)/QCI pipeline |
| Scheduled run | Automated tasks | Set the scheduled task frequency |
WeCom smart bot configuration steps:
- In the WeCom workbench, search for "Smart Bot" → create a bot
- Choose "Manual creation - API mode"
- Set the bot's basic info
- Enter the Bot ID and Secret into the Knot agent's "Usage Configuration"
- Save the smart bot configuration first, then save the Knot configuration
- Wait 5-8 seconds for "Connected" to appear, and it's ready to use
5.2.4 Sharing an Agent with the Team
- On the agent's detail page → Usage Configuration → Permission Configuration
- Edit the "can use" permission, and add team members
- Workspaces can also be shared — turn on the share toggle from the workspace management page
5.3 Configuring CodeBuddy SubAgents
Subagents are one of CodeBuddy's core collaboration capabilities — letting multiple specialized agents automatically work together within a conversation to complete complex tasks.
5.3.1 What Is a SubAgent
In day-to-day development, we keep running into the same fixed scenarios (requirement analysis, architecture planning, i18n work, refactoring, and so on) — handling these repeatedly means rewriting the same prompts, referencing the same knowledge bases, and picking the same tools over and over.
SubAgents solve this: you flexibly combine prompts, tools, and knowledge bases per scenario to build a business-specific agent, and once enabled, the default Agent conversation can dynamically invoke the right subagent based on the task at hand to help get it done.
5.3.2 Creating a Custom Agent
Step 1: Create the agent
- In the mode selector at the bottom-left of the CodeBuddy chat box, click "Create Agent"
- Or, at the top of the chat panel, go to Settings → Chat → scroll down to "Custom Agents"
Step 2: Configure the agent
Fill in the agent's basic info, and combine whichever tools, MCPs, and knowledge bases it can call:
| Field | Description | Notes |
|---|---|---|
| Name | The agent's name | Keep it short and clear |
| Description | Its responsibilities | Very important — matching to this agent is based on this description |
| Prompt | Behavioral guidance | Defines its role, capabilities, and constraints |
| Tools | Tools it can call | Choose as needed |
| MCP | MCP services it can call | Choose as needed |
| Knowledge base | Associated knowledge bases | Pick ones tightly relevant to the scenario — fewer but sharper |
⚠️ Once selected, a knowledge base will be actively referenced whenever this agent is used in conversation — try to pick only knowledge bases tightly relevant to this scenario. Knowledge bases you didn't select can still be referenced manually with
@during a conversation.
5.3.3 Enabling It as a SubAgent
If you need multiple agents cooperating on a more complex workflow, you can enable automatic subagent invocation:
- Add an accurate description of its responsibilities to the agent (this description matters — matching is based on it)
- Check the "SubAgent" option
Tips for improving how often a subagent gets invoked:
Add trigger conditions to the description, for example:
Invoke me whenever the user makes a request related to databases / data queries / reports / EDA5.3.4 Recommended Team SubAgent Configurations
| SubAgent Name | Responsibility | Associated Knowledge Base | Associated MCP |
|---|---|---|---|
| Requirement Analysis Expert | Analyzes requirement docs, generates requirements.md | Business requirement docs | TAPD MCP |
| Architecture Design Expert | Analyzes project architecture, gives design recommendations | Team technical docs, AI Wiki | - |
| Database Expert | Database design, SQL optimization, schema analysis | - | DB MCP |
| Code Review Expert | Code review, checks compliance | Team coding standard | 工蜂 MCP |
| Ops Troubleshooting Expert | Analyzes logs, locates issues, gives fix recommendations | Ops manual | Monitoring MCP |
5.3.5 Publicly Sharing an Agent
An agent you've created can be shared with the team via the Knot platform:
- Go to the Knot agent management page
- Select the agent to share (ones created in CodeBuddy will show a "CodeBuddy Agent" tag)
- Go to Usage Configuration and edit who can see/use it
- Once a team member favorites it on the Knot platform, the agent shows up in their CodeBuddy custom agent list
5.4 Skills Configuration
Skills are operating manuals for the AI — they lock the team's expert experience, best practices, and operating procedures into instructions the AI can execute.
5.4.1 Skill File Structure Convention
---
name: "rainbow-config"
description: "Connect to, query, and update the 七彩石 (Rainbow) config center.
Use this when you need to do any of the following with a 七彩石 config:
(1) Initialize/connect to the config center
(2) Query a config group (KV-style or table-style)
(3) Get/set a single config parameter
(4) Add a listener for config changes"
---

# 七彩石 (Rainbow) Config Integration Skill

## Prerequisites
- The project already imports the `pkg/rainbow` package
- The 七彩石 AppID and Group are already configured

## Operating Steps
### Step 1: Initialize the connection
[Concrete code template and explanation...]
### Step 2: Query the config
[Concrete code template and explanation...]
### Step 3: Listen for changes
[Concrete code template and explanation...]

## Notes
- Caching strategy for the config
- Error-handling conventions
- Fallback plan
5.4.2 The Skill Creation and Reuse Flow
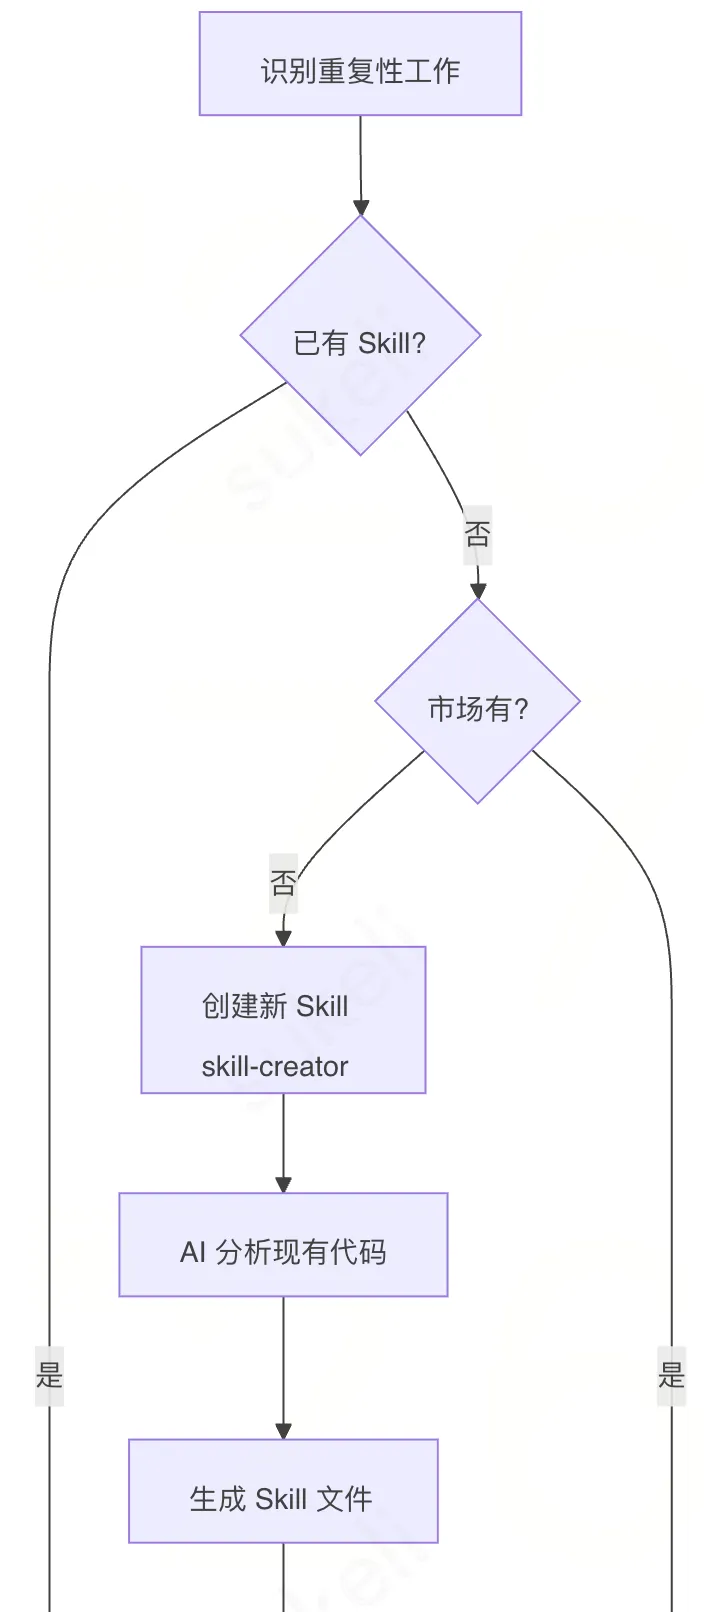
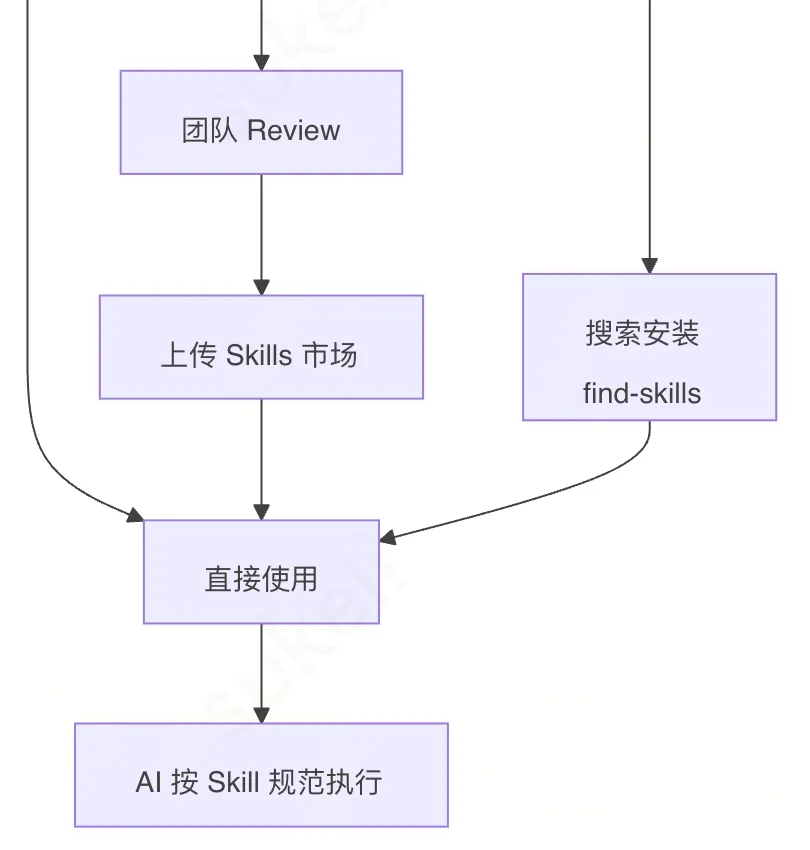
5.4.3 Creating a Skill: A Walkthrough
Step 1: Install skill-creator
Search for and install skill-creator in CodeBuddy's Skills management interface.
Step 2: Have the AI analyze existing code and create the Skill
I need to create a Skill for the pkg/rainbow 七彩石 config utility package.
Please analyze this package's code and generate a standard Skill file following skill-creator's conventions.
Step 3: Review the generated Skill file
Check whether the AI-generated Skill includes:
- ✅ An accurate
nameanddescription(this determines when the AI triggers this Skill) - ✅ Complete prerequisite documentation
- ✅ Step-by-step operating instructions
- ✅ Code templates and configuration examples
- ✅ Notes and error handling
Step 4: Verify the Skill works
I need to integrate the 七彩石 config center into the current project, and read all configs under the app_config group.The AI should automatically recognize and load the rainbow-config Skill, and generate integration code following the convention.
Step 5: Upload it to the team Skills repo
cp -r .codebuddy/skills/rainbow-config/ /path/to/team-harness/skills/business/
cd /path/to/team-harness
git add skills/business/rainbow-config/
git commit -m "feat: add 七彩石 config integration Skill"
git push
5.5 Spec and Plan Mode (Spec-Driven Development)
Plan mode is the core mechanism for spec-driven development: before the AI writes any code, it first generates a structured requirement document and task list; only after a human reviews and confirms them does execution proceed step by step according to the plan.
5.5.1 The Plan-Mode Development Flow (4 Stages)

| Stage | Action | Mode | Output |
|---|---|---|---|
| Stage 1 | Describe the requirement; the AI generates the requirement document | Plan mode | .codebuddy/plan/feat-xxx/requirements.md |
| Stage 2 | A human reviews the requirement document item by item | Human review | An approved requirements.md |
| Stage 3 | The AI generates a task list and executes it step by step | Agent mode | .codebuddy/plan/feat-xxx/task.md + source code |
| Stage 4 | A human reviews the code and archives the change | Human review | Archived docs + changelog |
5.5.2 A Worked Example: Adding a User Operation Log Module
Step 1: Switch to Plan mode and describe the requirement
Please use Plan mode to analyze the following requirement and generate
.codebuddy/plan/feat-operation-log/requirements.md:

Add a user operation log module, with the following requirements:
1. Record key user actions (login, profile edits, data deletion, etc.)
2. Support querying logs by user ID, action type, and time range
3. Provide a paginated log-listing API for the admin backend
4. Retain log data for 90 days, with automatic cleanup after expiry

Please spell out: the feature's scope, API interface definitions, database
table schema, exception-handling strategy, and acceptance criteria.
Step 2: Review the AI-generated requirements.md
□ Is the requirement understood accurately? Anything over- or under-scoped?
□ Do the API paths follow the team's RESTful conventions?
□ Do the database table/column names follow team conventions? Is the index design reasonable?
□ Is the implementation plan for the 90-day auto-cleanup actually feasible?
□ Does the exception handling cover: DB write failures, query timeouts, invalid parameters, etc.?
□ Is every acceptance criterion actually testable?
Step 3: Once confirmed, generate the task list and execute
The requirement has passed review. Please read
.codebuddy/plan/feat-operation-log/requirements.md, generate a task list
at .codebuddy/plan/feat-operation-log/task.md, then implement it step by
step in task order. Automatically compile and verify after each task.
Step 4: Human review, then archive
# Archive
mv .codebuddy/plan/feat-operation-log .codebuddy/plan/archive/feat-operation-log
VI. Day-to-Day Development SOPs (Standard Operating Procedures)
6.1 SOP-A: New Feature Development
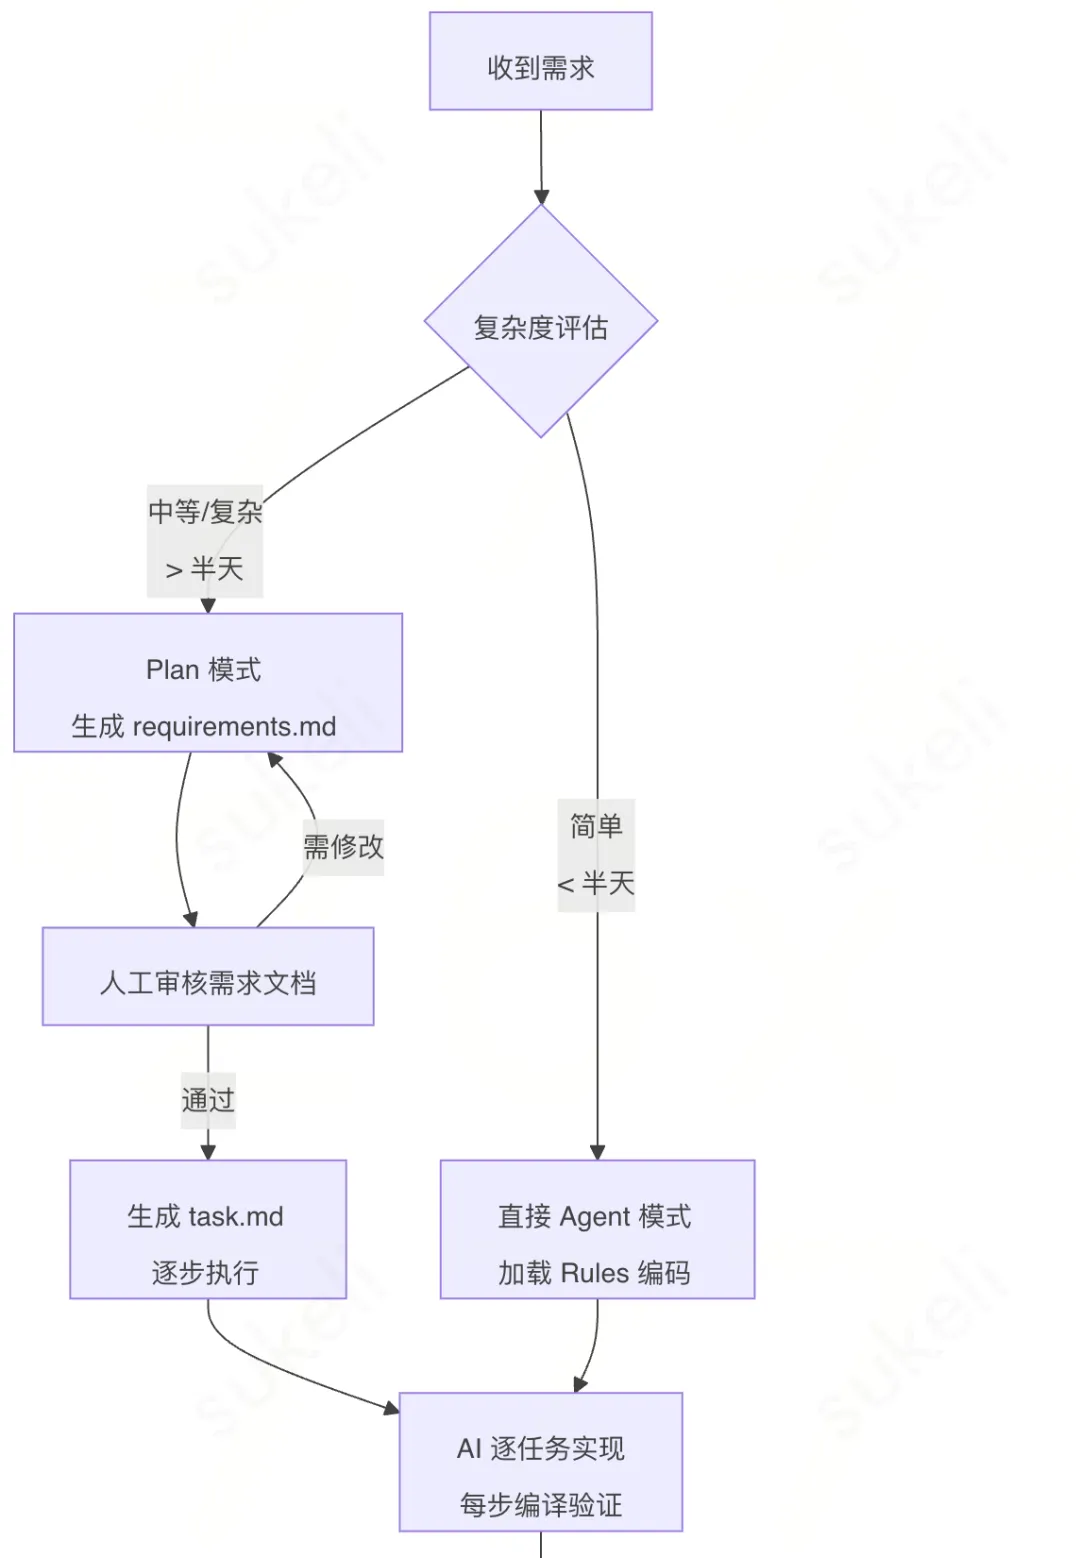
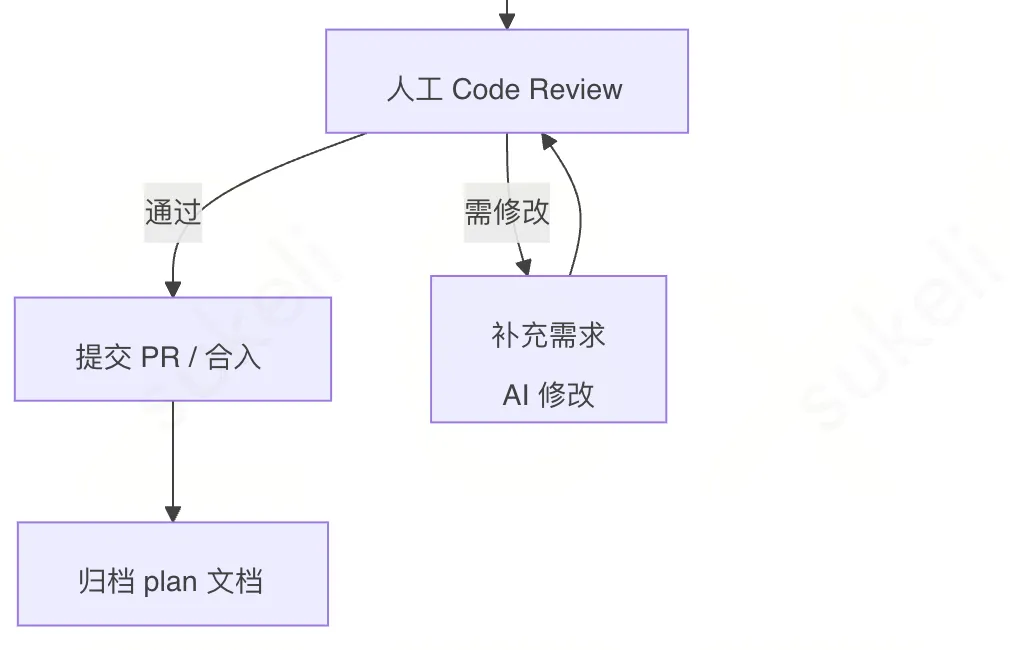
A shortcut flow for simple requirements (< half a day of work):
# Describe the requirement directly in Agent mode, no need to generate requirements.md
# But you still need to follow the Rules constraints

Please add a new GetUserProfile method in internal/user/service.go,
with the following requirements:
1. Look up basic user info by user_id
2. Return a UserProfileResponse struct
3. Include error handling and logging
4. Write the corresponding unit tests
6.2 SOP-B: Bug Fixes
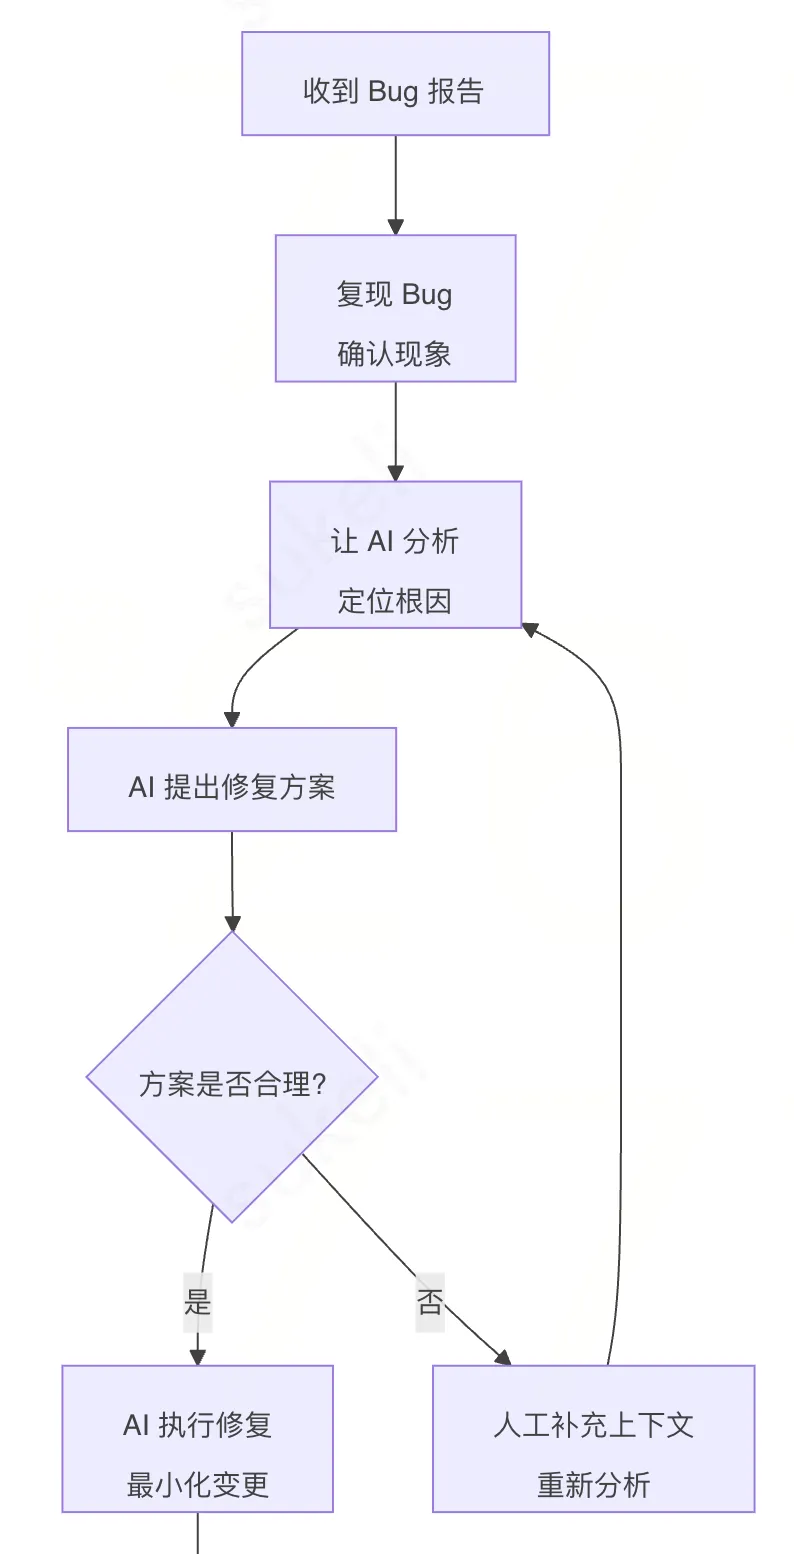
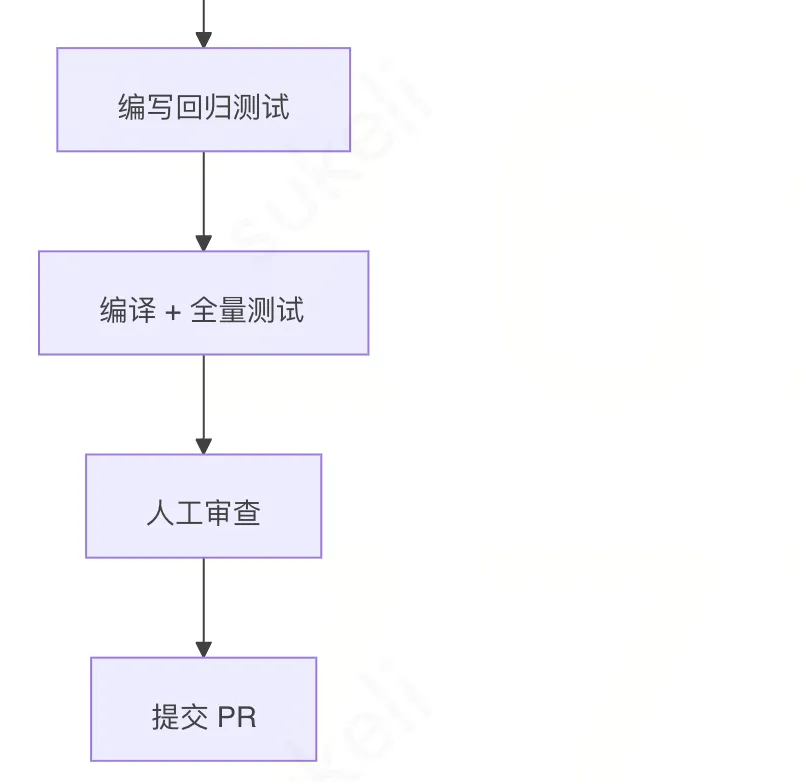
Bug-fix red lines:
- One PR fixes one bug — no sneaking in other changes
- A test case that reproduces the bug must be written
- Commit message format:
fix: [module name] fix xxx issue (#issue-number)
6.3 SOP-C: AI-Assisted Code Review
Method 1: Self-review before submitting
Please do a code review of the changes in the following files:
- internal/user/service.go
- internal/user/repository.go

Review focus:
1. Does it follow the layered architecture standard?
2. Is error handling complete?
3. Are there any potential performance issues?
4. Is naming consistent and are comments clear?
5. Are there any security concerns?
Method 2: Reviewing someone else's PR
Please read through the changes in the following PR and give code review feedback:
[paste the diff or list the files]

Focus on: logical correctness, edge-case handling, consistency with existing
code, and test coverage
Code review checklist:
| Category | Check | Description |
|---|---|---|
| Architecture | Is layering correct | Controller has no business logic, Repository has no business decisions |
| Architecture | Does it reuse existing modules | Check pkg/ for a reusable utility |
| Quality | Error handling | Every error must be handled explicitly — no _ = err |
| Quality | Unit tests | Core logic must have tests covering both the happy path and error paths |
| Security | SQL injection | Parameterized queries — no string-concatenated SQL |
| Security | Sensitive data | No hardcoded secrets or connection strings |
| Performance | Database queries | Check for N+1 queries or full table scans |
| Convention | Commit message | Clear format, describes what changed and why |
VII. Team Collaboration Red Lines (Non-Negotiable)
| Red Line | Description |
|---|---|
| Spec before code | Strictly forbidden to start coding without a clear spec |
| Shared Rules | Project-level Rules must be synced to the Git repo — no private local-only copies |
| Skills get extracted | Generalizable logic must be abstracted into a Skill so the whole team can reuse it |
| MCP first | Critical metadata should sync in real time via MCP, not through manually maintained copies |
| Traceable changes | Every code change must come with a clear commit message |
VIII. Common Pitfalls and Anti-Patterns
8.1 Anti-Pattern Checklist
| # | Anti-Pattern | Symptom | The Right Way |
|---|---|---|---|
| 1 | The giant prompt | Dumping a multi-thousand-word requirement on the AI all at once | Use Plan mode first to generate requirements.md, then break it down and execute step by step |
| 2 | Skipping review and coding directly | Assuming the requirement is simple and letting the AI write code with no spec | Requirements taking more than half a day must go through Plan mode |
| 3 | Writing Rules and never maintaining them | The Rules file gets written once and left alone — six months later it no longer matches actual practice | Check it regularly in a monthly review meeting |
| 4 | Over-integrating MCP | Connecting a dozen-plus MCP servers, token consumption explodes | Only integrate P0/P1-priority MCPs |
| 5 | Skills that aren't atomic | Cramming too much functionality into one Skill | One Skill solves one class of problem |
| 6 | Blindly trusting AI output | Merging AI-generated code without review | All AI-generated code must go through human code review |
| 7 | Chat history as documentation | Requirement details live entirely in chat logs | Requirements and design decisions must be persisted to .codebuddy/plan/ |
| 8 | One PR that changes everything | Having the AI implement several unrelated features in one go | One PR solves one problem |
IX. Compliance Self-Check: A One-Command Health Check with a Homegrown Skill
The previous chapters laid out the playbook, the tools, and the SOPs in full. But the biggest pain point in actually rolling this out is that writing a playbook is easy — actually following it is hard. Did team members really configure Rules per the standard? Did the project actually create a .codebuddy/skills/ directory? Are commit messages actually compliant?
Manually going through project after project is slow and easy to miss things. So we built a harness-audit Skill based on the playbook above — turning the entire checklist into an executable compliance audit tool. One sentence is enough to score a project, spot its problems, and get recommendations.
9.1 What This Skill Can Do
harness-audit is an automated compliance-checking tool for the Harness playbook, covering every core dimension discussed earlier in this doc. It does three things:
- Score: rates the project across 7 dimensions for a total out of 100, graded on an S/A/B/C/D scale
- Diagnose: lists specific issues per dimension (what's missing, what doesn't follow the standard, what exists but isn't being used well)
- Prescribe: gives improvement recommendations prioritized P0/P1/P2/P3, with operating steps and code examples
How it maps back to this playbook:
| Audit Dimension | Weight | Corresponding Section | What Gets Checked |
|---|---|---|---|
| 1. AGENTS.md (AI manual) | 15% | §4.4 Writing AGENTS.md | Whether it exists, whether it's lean (~100 lines), whether it covers project overview / architecture / directory structure / common commands |
| 2. Rules (constraint system) | 20% | §4.3 Rules Configuration | The .codebuddy/rules/ directory, frontmatter conventions, completeness of architecture/style/security constraints |
| 3. Skills (accumulated skills) | 15% | §5.4 Skills Configuration | The .codebuddy/skills/ directory, number of Skills, SKILL.md conformance, business relevance |
| 4. MCP (context extension) | 10% | §5.1 MCP Configuration | Whether mcp.json exists, server config conventions, whether sensitive info is hardcoded |
| 5. Plan mode (SDD) | 15% | §5.5 Spec and Plan Mode | The .codebuddy/plan/ directory, completeness of requirements.md / task.md |
| 6. Project engineering standards | 15% | §6 Day-to-Day Development SOPs | Directory structure, layered architecture, README, dependency management, .gitignore |
| 7. Commit conventions and collaboration | 10% | §6.2 Bug-Fix Red Lines / §7 Team Collaboration Red Lines | Commit format (type: [scope] description), change granularity |
As you can see, every audit dimension maps precisely to a specific chapter of this playbook — the Skill is the executable version of the playbook itself.
9.2 How to Use It
Prerequisites:
- CodeBuddy plugin installed and basic configuration complete (see §4.1)
- The
harness-auditSkill is placed under.codebuddy/skills/, or synced through the team Skills repo
How to trigger it (just type this in CodeBuddy's Agent mode):
# Audit the current local project
Please use the harness-audit Skill to run a compliance audit on the current project.

# Audit a remote 工蜂 project (requires the 工蜂 MCP)
Please use the harness-audit Skill to audit this project:
https://git.xxx.com

# Focus on just a few dimensions
Please use the harness-audit Skill to audit the current project, focusing on the Rules and Skills dimensions.
The AI automatically loads the Skill and runs through three stages — "gather information → score each dimension → generate the report" — then writes the full report to .codebuddy/reports/harness-audit-{project-name}-{date}.md and shows a summary in the conversation.
9.3 A Sample Audit Result
Below is a summary of an audit report run against a real Go backend project (excerpted from the full report):
📋 Project Basic Info
| Field | Value |
|---|---|
| Project name | go_scaffolding_svr |
| Project URL | git.xxx.com |
| Project owner | zhangsan (inferred from Git commit history) |
| Audited branch | master |
| Tech stack | Go 1.21 + tRPC-Go |
| Last active | 2026-04-15 18:32 |
| Total commits | 287 |
| Core contributors | zhangsan (158), lisi (72), wangwu (35) |
🎯 Overall Score
┌──────────────────────────────────────────────────┐
│                                                  │
│      Total: 75 / 100      Grade: A 🟢 Excellent  │
│                                                  │
│   0────40────60────75──89────100                 │
│   D    C     B    ▲A    S                       │
│                                                  │
│   Comment: The AI-assisted dev system is solid, │
│   core elements are in place                     │
│                                                  │
└──────────────────────────────────────────────────┘| Dimension | Score | Max | Rate | Grade |
|---|---|---|---|---|
| AGENTS.md | 14 | 15 | 93% | 🟢 Excellent |
| Rules | 18 | 20 | 90% | 🟢 Excellent |
| Skills | 12 | 15 | 80% | 🟢 Excellent |
| MCP | 0 | 10 | 0% | 🔴 Failing |
| Plan mode | 12 | 15 | 80% | 🟢 Excellent |
| Engineering standards | 13 | 15 | 87% | 🟢 Excellent |
| Commit conventions | 6 | 10 | 60% | 🟡 Good |
| Total | 75 | 100 | 75% | 🟢 Grade A |
(Chart: Harness compliance score rate by dimension — AGENTS.md, Rules, Skills, MCP, Plan, Engineering, Commit; y-axis: score rate (%), 0–100)
✅ Highlights
- AGENTS.md is highly lean: 78 lines, in line with the "index, not encyclopedia" design principle
- A solid Rules system:
.codebuddy/rules/has three files —global.md,go-backend.md,security.md— covering architecture, style, and security - Skills are strongly business-relevant: 5 business Skills accumulated, including
rainbow-configandpolaris-resource - Standard directory layout: strictly follows the
cmd/internal/pkg/apistandard layout
⚠️ Key Issues
- 🔴 No MCP configured: there's no
mcp.jsonin the project root, so the AI can't read the database schema or 工蜂 issues in real time - 🟠 Commit messages aren't standardized: of the last 50 commits, 30% use vague descriptions like "update" or "fix bug"
- 🟡 The plan directory doesn't archive: there's no
archive/subdirectory under.codebuddy/plan/, so completed requirements never get archived
🔧 Improvement Recommendations (Excerpt)
🔴 P0 - Fix Immediately
- Integrate DB MCP (30 minutes, see §5.1.2)
{
  "mcpServers": {
    "db-mysql": {
      "command": "npx",
      "args": ["-y", "@anthropic/mcp-server-mysql"],
      "env": {
        "MYSQL_HOST": "${DB_HOST}",
        "MYSQL_USER": "readonly_user",
        "MYSQL_PASSWORD": "${DB_PASSWORD}"
      },
      "timeout": 10000,
      "transportType": "stdio"
    }
  }
}
🟠 P1 - Short-Term Improvements
- Standardize commit conventions (1 week): share the §6.2 commit format (
type: [scope] description) at the team's weekly meeting, and set up a git hook to auto-validate it - Establish a plan-archiving mechanism (30 minutes):
mkdir -p .codebuddy/plan/archive, and archive completed requirements there uniformly
🚀 Quick Wins
| Improvement | Estimated Time | Impact |
|---|---|---|
Create mcp.json to integrate DB MCP | 30 minutes | AI's SQL accuracy improves 30%+ |
Create .codebuddy/plan/archive/ | 5 minutes | Past requirements become traceable |
| Configure a commit-msg hook | 20 minutes | Commit compliance rate goes from 70% → 95%+ |
📈 Maturity Roadmap
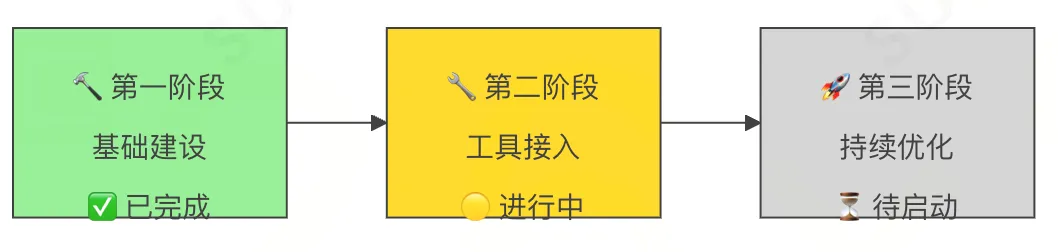
Current stage: Phase Two (Tool Integration)
Next-stage goal: fill in MCP integration, standardize commits, establish an archiving mechanism. Estimated time to reach it: 2 weeks
The full report (including item-by-item checklists across all 7 dimensions, a Mermaid pie chart, and a comparison against this playbook) gets written to
.codebuddy/reports/harness-audit-go_scaffolding_svr-20260416.md.
9.4 Recommended Usage Cadence
| Scenario | Frequency | Purpose |
|---|---|---|
| First time a project adopts the playbook | Once | Establish a baseline, plan improvements |
| Quarterly team retrospective | Once per quarter | Quantify how well the playbook is being followed, compare to last quarter |
| After a new project kicks off | Within 2 weeks of kickoff | Check whether the foundation-building phase is actually in place |
| Before a code review | As needed | Pair with §6.3 SOP-C for a pre-submission self-check |
| Shared audit on the Knot platform | Once per month | Compare across projects, identify S-grade benchmark projects |
⚠️ Note: an audit report is a health check, not a KPI. The point is to surface problems and drive improvement — don't turn the score into a performance metric. The whole purpose of the playbook is always to make AI more useful and the team more efficient, never to game a score.
Part Three: Conclusion
X. Conclusion
As the creator of Django once put it: the cost of shipping code has fallen to nearly zero, but the cost of shipping good code hasn't.
AI agent tools can help substantially with every aspect of code quality, but the final quality gate still rests on the people operating those tools. You have to know what good code looks like, you have to be able to judge whether what the agent produced is good enough, and you have to be able to make the right trade-off calls where it matters.
The cost has come down, but the bar can't. The tools have gotten stronger, and human judgment needs to keep pace.
Make every tool conform to the standard,
instead of relying on each person to adapt to every tool.
That's the shift from "humans driving AI" to "AI driving itself."
Through this playbook, a team can:
- Lower the cost of "shipping code" (AI does the execution)
- Write the standard for "shipping good code" into the harness system itself (playbook constraints)
- Achieve a "knowledge flywheel effect" — the more new members join, the higher overall efficiency gets, not lower (accumulated experience)
Master the underlying survival rule: tools come and go, but the playbook stays.
If anything here falls short, discussion and correction are welcome.