【DeepSeek Harness Plugin】01: Writing Your First Plugin from Scratch
You've probably used an AI assistant and thought: "I wish it could help me do this specific thing." In DeepSeek Harness, that "thing" is typically a plugin.
In this article we'll build a plugin from scratch: teach the assistant to greet someone with "Hello, XXX!" We'll build it, run it, see the model actually call it, then come back and explain layer by layer why it works. After reading, you'll be able to explain what a plugin is and write one yourself.
The example below assumes you already have the DeepSeek Harness source running locally per the official docs. The code itself doesn't depend on any private repos — just create a few new files and you can follow along.
Part 1: Build It from Scratch
1. Create a Directory
Create a directory for local experimental plugins somewhere convenient:
mkdir -p scratch-plugin/src2. Write the Plugin
Create scratch-plugin/src/my-plugin.ts and put this in it:
// A minimal plugin: registers a tool named greet so the model can greet someone.

import type { Context } from '@deepseek-ai/cordis'
import { defineTool } from '@deepseek-ai/dsh-tools'

// Plugin name, used only in logs.
export const name = 'hello-plugin'

// Declare dependency on the tools service. The framework waits for it before calling apply.
export const inject = ['tools']

export function apply(ctx: Context) {
  console.log('[hello-plugin] Plugin loaded!')

  // Register the tool via the tools service. After registration, the model can call it in conversations.
  ctx.tools.register(defineTool({
    name: 'greet',             // Name the model uses to call this tool
    description: '向某人打招呼。',  // Model uses this to decide whether to call
    parameters: {              // Parameter declarations, matching the fields destructured in execute below.
      name: {
        type: 'string', required: true, description: '要打招呼的对象名字'
      },
    },
    output: {
      schema: { type: 'string' },  // What the return value looks like
      // render converts the canonical value to tool result content returned to the model.
      render: (_args, value) => [{ type: 'text', text: value }],
    },
    // execute is the real implementation.
    async execute(args) {
      return `你好,${args.name}!`
    },
  }))
}
Don't worry about understanding every line yet — save it first, and we'll break it down later.
3. Write the Overlay File
The plugin is written but the framework doesn't know it exists. Create scratch-plugin/cordis.yml:
- insert:
  - id: hello
    name: '/absolute/path/to/scratch-plugin/src/my-plugin.ts'
Replace the path with the real absolute path on your machine. Note: the overlay only describes "what to mount"; the loader's base directory for resolving module paths doesn't change because of it, so relative paths would point elsewhere — you must use absolute paths (the official tutorial has the same requirement).
4. Run It and Watch It Work
When starting the web UI, mount this file as an overlay:
pnpm dsh web --patch ./scratch-plugin/cordis.ymlOpen http://127.0.0.1:3080, type "Greet Ada" in the dialog, and the model will decide to call the greet tool and reply "Hello, Ada!". The terminal will also show [hello-plugin] Plugin loaded!.
That's it — about thirty lines of code, and you've given the assistant a callable capability. Now let's break down how it actually works.
Part 2: Why Does It Work?
What Is a Plugin, Anyway?
Strip away the jargon, and a plugin is just a TypeScript module that exports an apply function. In our example we also exported name and inject — we'll see why shortly. When the framework loads the plugin, it calls apply and passes it ctx — the application's "shared bulletin board" where all capabilities are registered.
So writing a plugin isn't "writing a program" — it's "posting a note on a shared bulletin board telling the system what you provide." The note our code posted is: ctx.tools.register(...) hangs greet on the "tools" board.
Harness itself is built from a bunch of such plugins: tools, model adapters, file access, terminal UI — all modules挂着 apply(ctx). Your plugin runs in the same ctx as them, all equals, all discoverable to each other.
So there's a simple rule: packages don't import each other's implementations. When you need someone's capability, you fetch it from ctx by name — this prevents packages from entangling each other.
Three Forms — Start with the Simplest
Plugins allow three forms, think of them as "shallow to deep":
- Function form: directly
export function apply(ctx) {}. This is what we wrote — most common, the default choice. - Object form: collect
name,inject, andapplyinto anexport defaultobject. Good when you want all three in one place. - Class form: write a class extending
Serviceto expose a new service onctxfor other plugins to consume — e.g., creating actx.myService.
The rule of thumb: use function form until you actually need to expose a service for other plugins, then upgrade to class form.
The first two are "function plugins," the last is "Service class plugin." Don't mix them: if you both export a default class and also have named function exports, the loader drops the function export and the capability silently disappears. Our example uses only three named exports (name/inject/apply) with no default export — that's the safe pattern.
name is just a diagnostic label for logs; the overlay doesn't use it to locate the plugin.
Mounting 101
Looking back at cordis.yml: it lists plugin entries to mount, with name pointing to the module's location. Note: this is a module path, distinct from the export const name label used only in logs. The insert is a patch action meaning "add this local plugin to the startup composition."
It's an overlay: a transparent sheet layered on top of the Harness base composition, not replacing it. So the startup command --patch ./scratch-plugin/cordis.yml essentially means: "start with the base composition, then additionally layer my local plugin on top."
Two common pitfalls:
- If
applythrows an error, the process crashes immediately and the error surfaces right there — not silently swallowed (fail loud in engineering terms). - If the
namepath is misspelled or the file can't be found, the framework reports it via the logging service, but if startup is too early that log might get lost before the console is ready. So when a plugin is "completely silent," the first thing to check is the path in the overlay.
Who Goes First? Dependency Decides
Note export const inject = ['tools'] in the code. This isn't a decorator — it says: "My plugin depends on the tools service."
With this, the framework waits for the tools service to be ready before calling our apply, so ctx.tools is guaranteed to exist. tools itself is a service that another plugin registered on ctx — we're just its consumer.
Here's a counterintuitive but important fact: overlay entries start concurrently; write order doesn't determine apply call order. The real order is computed from service dependencies: you declare what you depend on, and the framework guarantees it will be ready first. So you don't need to worry about "putting tools first" — just write inject correctly and let the framework handle the queuing.
How Plugins Clean Up
Everything registered through ctx — event listeners, tools, timers — is automatically cleaned up when the plugin unloads. You don't need to write removeListener or clearInterval yourself. Our ctx.tools.register(greet) is exactly like this: when the plugin unloads (hot reload or app shutdown), greet automatically disappears from the tool table.
For resources that must be explicitly cleaned up, like a network connection, use ctx.effect() to tell the framework "how to tear down":
export function apply(ctx: Context) {
  ctx.effect(() => {
    const timer = setInterval(() => console.log('heartbeat'), 5000)
    return () => clearInterval(timer)  // Runs when the plugin unloads
  })
}
The function passed to effect returns a cleanup function that runs on unload — the "dismantling instructions." One-liner: register via ctx wherever possible, otherwise wrap in effect, so unloading misses nothing.
What Does That Tool Actually Look Like?
What we actually did was use defineTool to create a model-callable tool. Its parameters, output, and execute can be understood as three parts: input controls what the model fills in (input contract), execute controls the computation (business logic), output controls what comes out and what text the model reads (output contract).
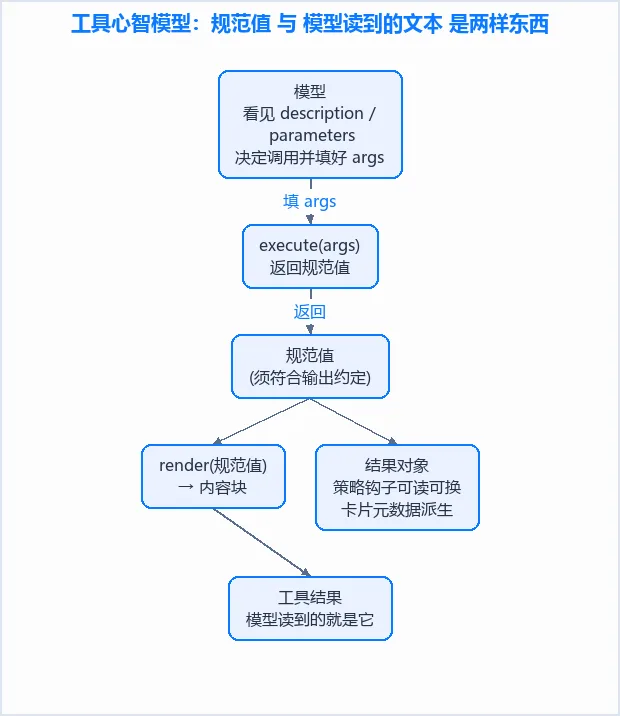
Looking at the greeting code with this in mind:
- Input (parameters): declares the parameters the model should fill in.
defineToolinfers and validates inputs from this, so the execute function gets correctly typedargsdirectly; if a required field is missing, the framework blocks it. - Execute: the real business logic, returns the canonical value, must match the output contract or validation rejects it.
- Output:
schemaconstrains what the return value looks like,renderconverts the canonical value to text the model reads. In our greeting example,renderwraps "Hello, Ada!" into a text block — that's what the model sees as the tool result.
Here's the most easily overlooked yet critical distinction: the canonical value returned by execute, and the tool result text the model reads, are two different things.
- Canonical value: the execute function's return value, validated then frozen into an immutable value. It's machine-readable raw data kept in the result for strategy hooks and UI cards to use.
- Result content: the text block that
renderconverts the canonical value into — this is what goes into the tool result message returned to the model. The model reads the rendered text, not the value thatexecutereturned itself.
So schema governs "whether the value is correct," and render governs "what the model reads." Separating "computed value" from "rendered text" is the core of defineTool. For example, if a tool returns structured JSON, render turns it into a readable sentence; the model reads that sentence, while strategy hooks and cards can still access the full JSON from the canonical value for judgments and card rendering.
Once registered, the model can understand "Greet Ada" in conversation, call greet on its own, and treat "Hello, Ada!" as the tool result. This entire pattern is the standard way a plain plugin "contributes capability": you don't write your own HTTP interface or conversation loop — just hang your capability on ctx.tools and let Harness handle the rest.
Part 3: Going Further
When to Split, When Not To
What we wrote is just a single-purpose utility: one greet tool, one package — that's fine.
Only when you need replaceable capabilities does splitting pay off: separating Service Definition, Service Provider, and Consumer into independent packages, but only when they each evolve independently (the 第 5 篇 covers this with LLM, shell, and fs as examples).
One common misconception to clarify: a capability seam is not "another plugin type" — it's a composition pattern. All three pieces must be present for it to be a seam; a single role alone doesn't count. So don't confuse "I'm building a provider" with "I'm inventing a new plugin type."
What Does Splitting Actually Look Like? Splitting greet for Real
Let's actually split greet. Next to scratch-plugin/, create scratch-seam/ with four subdirectories:
scratch-seam/
├── greeting-definition/        Capability definition: pure contract library, not in the overlay
├── greeting-provider-local/    Provider (casual version)
├── greeting-provider-polite/   Provider (polite version): alternate with local
├── greeting-tool/              Consumer: registers the greet tool
└── cordis.yml                 Only mounts provider and consumer entries
The definition declares only the contract: an abstract class uses super(ctx, 'greeting') to register the service name on ctx, with input and output types defined in the contract — no implementation. It's a library, not a plugin:
// scratch-seam/greeting-definition/src/index.ts (excerpt)
import { Context, Service } from '@deepseek-ai/cordis'

declare module '@deepseek-ai/cordis' {
  interface Context { greeting: GreetingService }
}

export interface GreetRequest { readonly name: string }
export interface GreetingMessage { readonly text: string }

export abstract class GreetingService extends Service {
  constructor(ctx: Context) { super(ctx, 'greeting') }
  abstract greet(request: GreetRequest): GreetingMessage
}
The provider subclasses the contract and implements greet, auto-registering as ctx.greeting when mounted as a class plugin. The polite version is a second implementation of the same contract, changing only the greet return text:
// scratch-seam/greeting-provider-local/src/index.ts
import type { Context } from '@deepseek-ai/cordis'
import type { GreetRequest, GreetingMessage } from '../../greeting-definition/src/index.ts'
import { GreetingService } from '../../greeting-definition/src/index.ts'

export default class LocalGreeting extends GreetingService {
  constructor(ctx: Context) { super(ctx) }
  greet(request: GreetRequest): GreetingMessage {
    return { text: `Hello, ${request.name}!` }
  }
}
The consumer is nearly identical to the greet tool from Part 1, with only two changes: inject declares one more greeting service dependency, and execute no longer constructs the string itself — it calls ctx.greeting.greet(...). It doesn't import the provider at all, only import type for the contract:
// scratch-seam/greeting-tool/src/index.ts (excerpt)
import type {} from '../../greeting-definition/src/index.ts'

export const inject = ['greeting', 'tools']

export function apply(ctx: Context) {
  ctx.tools.register(defineTool({
    // name/description/parameters/output identical to Part 1
    async execute(args) {
      return ctx.greeting.greet({ name: args.name }).text
    },
  }))
}
Running it produces the same result as Part 1:
pnpm dsh web --patch ./scratch-seam/cordis.ymlNow you can experience the value of splitting: change the provider path in the overlay from greeting-provider-local to greeting-provider-polite and restart — the same question gets "Good day, Ada! A pleasure to meet you." — while greeting-tool/ doesn't change a single line, because it only knows the contract. Both providers can't be mounted simultaneously: registering the same greeting service twice on the same ctx throws an error. This is the "one key, one implementation" constraint in action.
How the Three Pieces Fit: Definition at the Center, Provider and Consumer Independent
After splitting, the three pieces don't form an equilateral triangle — they form a star with the definition at the center:
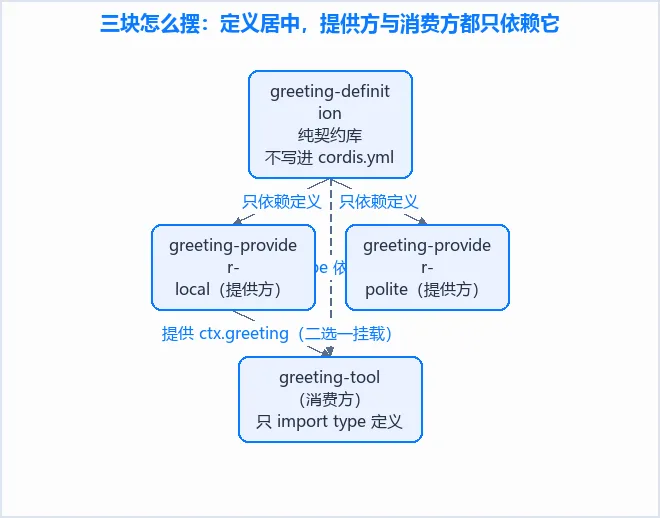
Three dependency directions:
- The definition is the hub: both provider and consumer depend on it; it depends on neither. The abstract class uses
super(ctx, 'greeting')in its constructor to establish the service name, then uses declaration merging to addctx.greeting's type toContext; together, these makectx.greetingboth exist and be typed. - Providers don't know each other: both providers only extend the abstract class; neither knows the other. Only one can be mounted per
ctx(re-registeringgreetingthrows), but multiple provider packages can coexist in the repo and be swapped as needed. - Consumer doesn't
importthe provider at all: the consumer onlyimport types the definition package to getctx.greeting's type — it never imports any provider implementation.
The structural benefits:
- Replaceability: the consumer only knows the contract. Swap
localforpoliteincordis.yml—greeting-tool/doesn't move — which is exactly what a capability seam is for. - Independent evolution: both providers change their implementations without affecting each other or the consumer; the consumer stays stable.
- Testability: the consumer can be tested with a stub provider (or even just the definition) without pulling in a real implementation.
Two red lines define the boundary of "independence":
- The definition must be a standalone library, not bundled into a provider package. Otherwise other providers and all consumers would depend on that provider package, and replaceability vanishes.
scratch-seamkeepsgreeting-definition/as its own package and doesn't add it tocordis.yml— this is the line being defended. - The consumer must not
importthe provider implementation. Once it does, swapping providers requires changing the consumer, the capability seam degenerates into ordinary coupling, and replaceability disappears.
From Local Play to Becoming a Proper Workspace Package
Both scratch-plugin and scratch-seam are just local experiments outside packages/: mounted temporarily via --patch, not part of the workspace, no quality checks, delete when done. "Workspace" refers to packages managed by pnpm in the packages/ tree; a package only becomes a workspace package when it's actually placed inside packages/.
Only promote to a workspace package when you want to integrate the plugin into the repo and maintain it alongside official packages — move the directory into packages/, become neighbors with official packages, and pass the same quality constraints:
- File skeleton: place in
packages/<group>/<pkg>/, withpackage.jsonobeying workspace constraints: must be a private package, version matching rootpackage.json,"type": "module", entry pointing tolib/, etc. - Register in root config: add a reference in
tsconfig.host.json'sreferences. - Quality checks:
pnpm run constraints,pnpm run typecheck,pnpm run lint,pnpm run build, etc.
Part 4: Wrapping Up
A plain plugin, distilled: a TypeScript module that exports function apply(ctx), registers capabilities via ctx, and gets composed into the application via an overlay: temporarily via --patch, permanently by including in the composition bundle.
We walked the shortest path from zero to a working plugin, confirming three things along the way: function form is most common, function plugins use named exports not default exports, and inject-declared dependencies determine startup order — these are the prerequisites to think through before starting.
For systematic depth, follow the official docs chain:《第一个插件》→《开发一个工具》→《插件配置》.